Sweet November Stamps ~ The Joys of "Wynter"

Happy Saturday everyone!  I hope you had a wonderful holiday.  Today I'm sharing another fun winter card today!

Today's card features the sweet digital stamps "Flutterbee Wynter" and "Midnights Oops Poinsettia" stamp set from Sweet November Stamps.

For my card I pulled my images into my Photoshop software and layered my images.  Then I deleted the poinsettia pieces from my image.  Then off to the printer it went!

I began by mapping out my tree shapes using a light Copic Marker.  Then I used my blue-purple markers and colored in all the layers of sky.

I colored up my Flutterbee Wynter with her snowman and the adorable little kitty too.

To finish off the card, I stamped a sentiment from the newly released clear stamp set "Snow Angels" in red ink.


I hope you all have a wonderful weekend ringing in the new year!  Happy 2023!

~ Ally ~


Sweet November Stamps ~ Winter Friendship

Happy Saturday everyone!  Today I'm sharing a fun winter card today!

Today's card features the sweet "Snowman Selfie" stamp set from Sweet November Stamps.

For my card I stamped my adorable image using Memento Tuxedo Black ink.  Then I began to block out my tree trunks in the background.  I colored the sky in between the trees first and the added shading to the trees.


Next I colored in my snowman and his friend, leaving the red Copic colors for the last.  I used a few Polychromos Pencils to add a little bit of knitted texture to the snowman's scarf.

I stamped out a sentiment from the same stamp set and added it as a simple tag to the front image.

As a final touch, I added some dots of Stardust Stickles for snowflakes.

Thanks for checking out my latest card today!  Have a wonderful weekend!

~ Ally ~


Sweet Sentiment ~ Handyman Happy Birthday

Happy Tuesday all!  Today is actually my final post for the Sweet Sentiment company as a design team member.  I made the decision a month or more ago that I needed to slow down just a bit with my design teams and needed to do a little pruning.  So I have decided to leave Sweet Sentiment and also Stamp Anniething.

For my final card, I wanted to use the cool "Handyman" stamp set and the Handyman icon with all the fun tools sticking out the top but I modified it slightly and added the words "Happy Birthday" underneath the Handyman aspect of the badge.

I stamped out 3 of the four handy people from the stamp set on SS Premium Coloring Cardstock and colored everything up with my Copic Markers.

There are actually coordinating "Handyman Metal Dies" that go with this stamp set but I don't have them so I fussy cut out everything.

To finish off the card, I die cut a rectangular piece of woodgrain cardstock to mount our images.

I stacked all that on some fun orange plaid paper to finish it all off.

A big thanks to Jammie and Sandy for allowing me to be a part of your amazing company for the last year.  You both inspire me to get creative!

I hope you all have a wonderful week!

~ Ally ~

Stamp Anniething ~ Elf on a Shelf

Today is my DT share day over at Stamp Anniething

Still being in the Christmas card making mood, I thought I'll pull another Christmas cutie from the digital stamps.

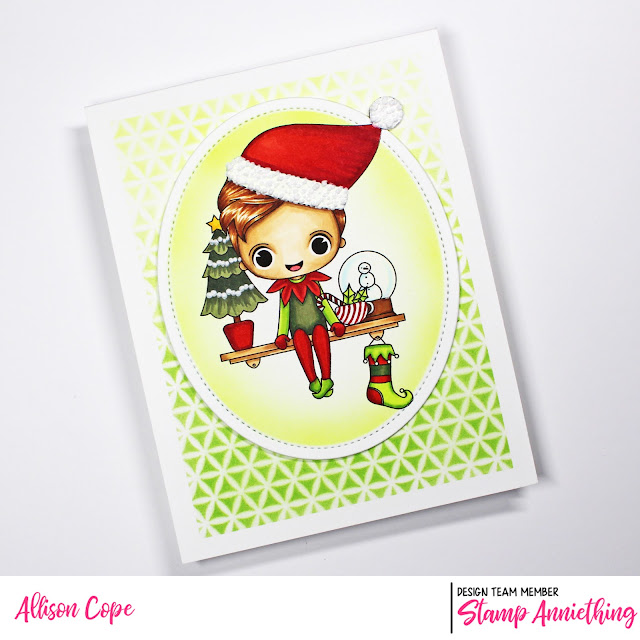
Meet "Elf on a Shelf"...

For my little fella, I used my Copic Markers to color him in.  Then I die cut him out using the Shaker Basics Oval Die making sure not to cut off his hat!

I left the oval die on the image and then using my Copic Airbrush system to add that citron glow to the edges.


To finish off my card, I used the "Diamond Flower Stencil" and my green Copics again and added an ombre of color to my card base.

I had a blast making this card!

Hope you have a great week everyone!

~ Ally ~


Stamp Anniething ~ Oh I Do Declare... It's Blanche!

Today is the final day of our Golden Girls December release from Stamp Anniething

We of course, saved the best for last!  Meet the sexy senior, "Blanche - Thank You For Being".

For today's card, I began by creating the room Blanche is standing in.  I began by created the wallpaper using the "Miami Parlour Stencil" and making a fun multi-green palm leave paper with a wood detailed wall.

She of course, needed a few potted plants made from the new "Houseplant Builder Dies" - these are brilliantly designed!!!  So much fun to customize your own garden!

For the final touch, I stamped our Blanche in black ink and colored her in using Copic Markers:

  • skin: E23, E11, E21, R21
  • hair: E27, E25, E35
  • purples: BV02, BV01, BV00, BV23
  • browns: E70, E74
  • plants: G46, YG17, YG03, YG01

It's always so fun to customize a character's clothing!

Make sure you check out the rest of this month's release goodies...

Thank you so much for joining me on our Golden Girl adventure these past 3 days.  I hope you go and check out all of this month's release.

Have a great weekend!

~ Ally ~


Stamp Anniething ~ Hope Your Day is Golden

It's Day 2 of our Golden Girls December release over at Stamp Anniething!  Annie is always coming up with the cutest themes!!!

Today we meet... "Dorothy - Hope Your Day is Golden"!

I paired our sassy Dorothy with our cool new "Thank You For Being a Friend Die".  This die features a heart shaped window with the entire saying at the top and bottom of the heart shape... perfect for a fun shaker window!

For Dorothy, I stamped her in Tuxedo Black Memento ink and colored her in with Copic Markers:

  • skin: E13, E11, E21, R20
  • hair: N4, N2, N0
  • reds: R39, R46, R27, R24
  • blacks: N10, N7, N6

I paired her up with some fun heart shaped clay and black confetti adornments and some red patterned paper from the "Retro Kitchen" 6x6 patterned paper pack.


So much fun!

Now here's what are our extras look like for the December release...

Thanks for checking out my friendly card today.  Stay tuned for our final Golden Girl tomorrow!

~ Ally ~

Stamp Anniething ~ The Golden Girls are Here!

 
Thank you for being a friend.
Travel down the road and back again.
Your heart is true, you're a pal and a confidant.

And if you threw a party, invited everyone you knew.
You would see the biggest gift would be from me
and the card attached would say,
thank you for being a friend. 
 
Yup... for Stamp Anniething, this month's theme is the GOLDEN GIRLS!!!  So fun!
 
Our first Golden Girl up for a sneak peek is... "Rose - Can I Ask a Question?"!
 
For my card, I began by creating my background.  I masked off a corner for my wall and created the palm tree background using Copics and the cool new "Miami Parlour Stencil".  Then I used some Copic Markers to create a brick wall and floor for Rose to stand in.
 
Then I stamped Rose out and colored her in using Copic Markers and die cut her out using her coordinating outline die.

Here are the Copics I used:

  • skin: E04, E53, E51, E21, E00 
  • hair: E43, E42, E41 
  • blues: B16, B14, B12, B000
  • greys: T1, T3, T4 
  • plants: YG01, YG03, YG17, YG67, BG93, BG96

To round out the scene, I used the new "Houseplant Builder Dies" to create a bunch of potted plants to put on the patio.  To finish off the card, I added the "Friend" sentiment from the "Thank You For Being a Friend Die".
 

Now here's what are our extras look like for December...
 

Thanks for checking out my fun card today.  Stay tuned for more Golden Girls fun tomorrow!

~ Ally ~

Chibitronics ~ Fading Reindeer Nose with Craft Effect Stickers


Howdy all and happy Wednesday! Today I'm over on the Chibitronics blog sharing a fun tutorial on how I made this cute little reindeer ornament where the reindeer's fades on and off with a little red light.  So cute!

I first began my little snow globe by die cutting all of the pieces, coloring in my starry sky, my wooden base plus stamping and coloring in my little "Reindeer" stamped image from Aall & Create with Copics.

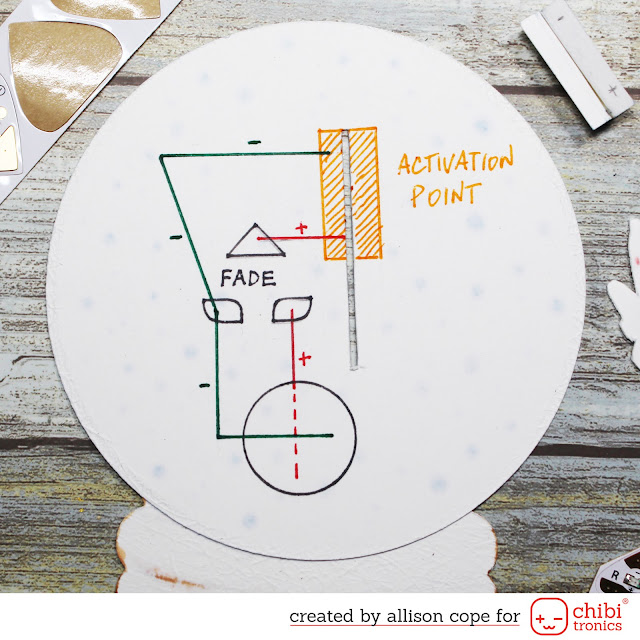
I started by cutting a tiny slit in the sky for my reindeer to travel up and down to close my circuit.

Next, on the back side of the globe, I planned out my circuit.  I am using a "Fade" Craft Effects Sticker today to have my reindeer's nose fade in and out.  The "Activation Point" shown is where the reindeer will slide up and make contact with the circuit to turn everything on.

On the back side of the reindeer image, I mapped out the position of my Red LED Light Sticker and where the positive and negative sides of the circuit were.  The black hatched rectangle is where the "I beam" is going to be located to allow the reindeer to travel up and down to compete the circuit.

Next I created the little "I" beam for the sliding mechanism for my reindeer.  I wrapped each of the beam using our Conductive Fabric Tape so the connections can be made to complete the circuit.  You can see a cross section of the "I" beam in the lower left hand corner of the image below - hence the "I" beam description.

I started my circuit by laying down the negative side of the circuit first.  This allows me to place the Conductive Fabric Tape underneath the battery.

Then I stuck down the positive side of my circuit. For the battery, all I did was run my Conductive Fabric Tape right over top of the battery and down the side to the rest of the positive side of the circuit.

For the reindeer side of the circuit, I taped my Red LED Light Sticker UPSIDE DOWN.  This allows the light to show up on the reindeer's nose. I added a little bit of Scotch tape over the circuit sticker so it wouldn't accidentally get stuck to any part of the insides of the ornament.  I completed both sides of the circuit.

Next I glued in the "I" beam to the rectangle on the circuit.  This allowed the positive and negative sides of the circuit to make contact with the rest of the circuit once the reindeer travels up and down the little slit in the globe.

I added some 3D foam to the backside of my reindeer.  This helps push out and stabilize the reindeer on the outside of the ornament.  I left on the backing to help the reindeer slide.

Next I folded up the flaps of the "I" beam and passed them through the slit placing the reindeer now on the front of the globe.  I then added a piece of foam tape on top of the "I" beam and I made a pull tab that is going to attach to the "I"beam to allow it to be pulled up and down to activate the light.  I also stuck down the "Fade" Craft Effect Sticker to the circuit.

When you pull the reindeer to the upper position, the circuit becomes complete and the Red LED Light Sticker lights up and the "Fade" Craft Effect Sticker causes the light to fade in and out.

I hope this inspires you to create something new and interactive!

~ Ally ~
Catherine Pooler ~ The New Release is HERE!

Today is release day for the new "Cheers to New Years" for Catherine Pooler Designs

Today I'm sharing a new card featuring the beautiful "Corner Swag Floral" stamp set from this release.  I began by stamping the full floral swag from the stamp set in 2 opposite corners.

Then I used my Blender Pen and colored up my swags.  I used Martini, Uptown, Sixteen Candles, Flirty Fuchsia and Cranberry Fizz inks.


Once I colored them up, I added some Star Dust Stickles to anything red.

I added everything to a slim black cardstock mat and then some fun black polka dot patterned paper from the new to come 6x6 patterned paper pack.

For the sentiment, I used the "In The Tropics Floral" stamp set.  It fit perfectly in the center.

Everything from the new release will go live in the Catherine Pooler shop today at 9am ET.  I hope you'll take a moment and use one of my affiliate links below to make your purchase.  I really appreciate it!

Happy shopping today!

~ Ally ~


All products go live in the CP Shop today at 9am ET...

Catherine Pooler ~ You Mean So Much To Me

It's time for the newest release from Catherine Pooler Designs and this one's fabulous!  Introducing the "Cheers to New Years" release! 

This release has some fun poppers and New Years related products but it also includes some beautiful florals too!

So I started today's card by using the sweet and happy honeycomb patterned paper from the "Bee Thankful" 6x6 paper pack. 

I stamped the beautiful swag of florals from the "Corner Swag Florals" stamp set and colored it using Copic Markers.  i then die cut it out with the new "Ruffles & Dashes Dies" - a must-have die set!

To finish off the inner panel, I splattered the whole thing with some black paint, added a heat embossed sentiment from the same stamp set and adhered some purple sequins from the new "Saint Lucia Sequins" mix.


    More Coming Up...        Noon on the Catherine Pooler Facebook page except where specified.    TODAY...        Last Bundle Reveal with LIVE Card Making    StampNation Early Ordering OPENS!!        3pm StampNation Exclusive YouTube    Wednesday, December 7th        General Ordering OPENS at 9am        Noon Release Party on YouTube!


Thanks for checking out my card today!  Don't forget the StampNation members get to shop NOW! (A whole day early!).  Everything from the release will be live in the Catherine Pooler shop at 9am ET tomorrow.  Happy Shopping!

~ Ally ~
 
09 10