Timeless Tuesday ~ It's All in the Date!


Howdy all!  Welcome to my challenge week for Timeless Tuesday at Flourishes.

This week's challenge is all about DATES... birth DATES that is!  For this challenge, we want you to create with the TWO items listed next to your birth month (see image below).  So for example, my birthday is in June, so I had to create a "birthday themed" project using the color pink.  You may use any additional supplies in your creation as long as you use the 2 elements listed below.


So as I said above, I have to create project using the JUNE elements: a birthday theme and the color pink!  Here is the card that I came up with...


I first started with a simple A2 card base using Flourishes Classic Kraft Cardstock.  I created a mat using Flourishes Classic Black Cardstock next and created my multiple patterned paper layers with additional stitching detail.

For my focal image, I die cut a rectangle from Flourishes Classic White Cardstock. Leaving the die on the cardstock, I stamped the present image from the "Bike Ride" stamp set first.  I created a simple "Post It Note" mask and then stamped my bike image right over the mask.  Then I took my Copic Marker airbrush tool and sprayed some Copic Y13 and splattered some R14 from the following Copic Collections:
I removed the cardstock from the die and coloured the remainder of my image using these Copic Collections:


Inside my card, I used the same patterned papers and created a block for my writing.  To finish off my birthday theme, I stamped my "Happy Birthday" greeting from the "Inside & Out: Happy" stamp collection using the Memento Ink colours, "Bahama Blue" and "Rose Bud".  I also stamped another bike image from the "Bike Ride" stamp set in a more subtle yellow ink.


I hope you have fun with my challenge this week!!

Take a peek at what the Timeless Tuesday designers have created for today’s challenge…
Allison Cope
Broni Holcombe
Cindy Haffner
Deborah Anton
Denise Marzec
Debbie Marcinkiewicz, our April Guest Designer

~ Ally ~

Supplies:
stamps: Flourishes (Inside & Out: Happy, Bike Ride)
cardstock: Flourishes Classic Kraft, Black & White
patterned papers: American Crafts
die cut shapes:  Spellbinders
ink: Memento, Copic
other: thread.

Read 2 Me!

Howdy sketch lovers!  It's another reveal day at Let's Capture Our Memories!

This week's reveal is a little more special though.  It's the last day for the Winter Sketch Team.  We're saying goodbye to a few of our designers... that sucks!  But that also means we are welcoming in a new team next week.  Hooray!

So for our final sketch for the Winter Sketch Team, we have this sketch... by yours truly!

And here is the layout I created using my own sketch this week...

Read 2 Me
 (click to enlarge)
To me, scrapbooking is truly an art so my layout this week was a true process.  I basically spent 5 hours changing a single 12x12 piece of white cardstock into this page.  I just simply HAD FUN with this one!

My journaling reads:
One of the best childhood memories I have is being 
curled up in bed with my mom and sister reading a 
good book.  I'm so glad Mama takes time to 
create this same memory with you!   April 5 2013.

I had lots of fun with letters.  I used my myStamp BOX "Tall Outline" Alphas to create the back ground and then I used some Making Memories alphabet stickers to create/trace my title.  I even traced the number 2 onto some overlapping pieces of washi tape to create that aspect of my title.


I used a lot of mists on this page.  I actually used them to "paint" between my stamped letters and around my clock images from Flourishes. I also using my American Crafts "Stamp Markers" and used them to add wisps of colour inside my letters.

My layout is very busy but that's what I love about it!  Hope you join us for our final April sketch at Let's Capture Our Memories today!  Make sure you check out what my fellow designers have done with my sketch too!

~ Ally ~

Supplies:
stamps: Flourishes, myStamp BOX, KaiserCraft
cardstock: Bazzill 
alpha stickers:  Making Memories
patterned papers:  Studio Calico
mists: Smooch, Tattered Angels
ink: Memento, Stampin' Up!
washi tapes:  My Mind's Eye, Tim Holtz
mini tickets:Maya Road
pens: American Crafts, Sharpie
brad: Echo Park
other: gesso, stickers, thread.

Timeless Tuesday ~ Wedding Wishes

 
Hello fellow Flourishes lovers!  Welcome to our latest "Timeless Tuesday Challenge" at Flourishes!  We are so happy to have you join us today.

This week, our challenge comes from the lovely Deborah!  Deborah's challenge is for us to create a card or project inspired by Weddings (FTTC217)!  Yup... as Spring and Summer are both fast approaching, so is wedding season!  The perfect time to create a wedding themed card.

So today I decided to create an anniversary card.  Yes... it's not "completely" wedding but it certainly celebrates a past wedding!  LOL!

Happy Anniversary

I first began by creating my framed bouquet.  I cut a frame using the Flourishes Perfectly Pierced Classic Frames die by Spellbinders from Flourishes Classic White Cardstock.  Then I stamped the large bouquet image from the NEW "Spring Blossoms" stamp set using Versamark ink onto vellum paper and heat embossed it with white embossing powder.  

I then die cut a lattice piece of white cardstock and then a soft yellow cardstock die shape from the "Color Made Easy" Sunflower paper collection.  I added some Ranger "Scattered Straw" ink to the center of my yellow cardstock to warm up the center of the cardstock.


I also coloured the back of my embossed image using the follow Copic Collections:

And here is a close up of the resulting focal image of my card...

Those pretty gems are Kaisercraft "Sparklets" in Crystal colour.  I also used the corresponding "Antique Gold" seam binding from the "Color Made Easy" ribbon collection to match my soft yellow cardstock.  My "Happy Anniversary" greeting is from the "Tag Lines" stamp collection.

I couldn't resist added some tulle layers (like you might find under a wedding dress) on my card along with some sparkly embossed cardstock!
I hope you have fun with our challenge this week!  We can't wait for you to share your wedding wishes with us.

DON'T FORGET ABOUT... our call for another "Friend of Flourishes" design team member!  The deadline is fast approaching so don't delay!  Get your application in today!  Deadline for the call is THIS Thursday!!!  For further call details, CLICK HERE!

Now... check out what my fellow design team members have created for this week's challenge...

Allison Cope
Broni Holcombe
Cindy Haffner
Deborah Anton
Debbie Marcinkiewicz, our April guest designer

We can't wait to see what you create with our challenge this week!  Have fun!!

~ Ally ~

Supplies:
stamps: Flourishes (Spring Blossoms, Tag Lines)
cardstock: Flourishes (Classic White)
patterned papers:  SEI
die cut shapes:  Spellbinders
ink: Copic, Ranger, Versamark
ribbon:Flourishes
gems: KaiserCraft
other: thread.

Snuggle Bunny

Happy Saturday everyone!  This week is the second time this month the girls at Let's Capture Our Memories are using one of my sketches! Yup... and here it is...

 And here is the layout I created using my own sketch as inspiration...


 Snuggle Bunny
 I thought the Authentique "Hope" line of papers was perfect for my bunny photos of my son!


 Hope you have a great weekend!

~ Ally ~

Supplies:
supplies: cardstock, Bazzill;  patterned papers, Authentique;  flowers, Prima;  brads, Stampin' Up!;  mist, Tattered Angels; ink, Ranger;  mask, The Crafter's Workshop;  tools, Klic N'Kut machine;  edge punch, Fiskars;  other, thread.

Timeless Tuesday ~ Frame It!


Hello stampers! Finally feeling a little better this morning.  Being sick sucks! Thanks for being patient with me this morning.

This week, our super talented hostess Cindy is challenging us to create a card or project where you create a frame on your project (FTTC216).  Super fun right?  Here is the card I created for this week's challenge...

Happiness
I began creating my card by creating the frame.  I began with a piece of the Flourishes Classic Ivory Cardstock and die cut it twice to get the basis of my frame shape.  Leaving the 2 die shapes on the cardstock, I then stamped my NEW "Bees & Blooms" images all over the frame using Memento "Black Tuxedo" ink.  I added some Ranger "Antique Linen" Distress Ink to the edges of my frame.

Then I created the inside of my frame by die cutting the same frame die cut shape using Flourishes Classic Ivory Cardstock again, adding some more Ranger "Antique Linen" Distress Ink to the edges of the inside of my frame.  Then I stamped the "Happiness..." quote by John Barrymore from the NEW "Over the Garden Gate" stamp set.I backed it with a piece of Flourishes Classic Black Cardstock and then fussy cut the frame shape to create a black matting.

For my background, I used the same steps as creating my mask.  Again I stamped the NEW "Bees & Blooms" images all over the background cardstock using Memento "Black Tuxedo" ink. A strip of washi tape, a bow made from Kraft Jute and a pretty flower and I was done!
  

DON'T FORGET ABOUT... our call for another "Friend of Flourishes" design team member!  The deadline is fast approaching so don't delay!  Get your application in today!  For call details, CLICK HERE!

Now... check out what my fellow design team members have created for Cindy's fabulous challenge this week...

Allison Cope
Broni Holcombe
Cindy Haffner
Deborah Anton
Denise Marzec 
Debbie Marcinkiewicz, our April guest designer

We can't wait to see what you create with our challenge this week!  Have fun!!

~ Ally ~

Supplies:
stamps: Flourishes (Bees & Blooms, Over the Garden Gate)
cardstock: Flourishes (Classic Ivory & Black)
die cut shapes:  Spellbinders
ink: Memento, Ranger
jute: Flourishes
washi tape: My Mind's Eye.

Timeless Tuesday

Hello everyone!  I will be back a little later in the day with my Flourishes creation.  I have been under the weather for about 24 hours and I just couldn't get to processing my photos.


Stay tuned later and I'll have my card up.


Thanks for understanding!

~ Ally ~

Stamps & Scraps ~ Gesso Fun!

Hello fellow stamp lovers!  It's that time of the month to share something fun on the Flourishes blog for my "Stamps & Scraps" article.

This month I'm sharing tutorial all using gesso and your stamps.  Check out the the Flourishes blog for a step by step tutorial today... click HERE!

Go from here...

To here...
... in only a few steps!

Happy stamping!

~ Ally ~

Supplies:
stamps: Flourishes (Antique Map, Moments in Time)
cardstock: Bazzill 
patterned paper: Studio Calico
ink: Memento
mists:  Smooch, Tattered Angels
tools: Klic n'Kut machine
other: thread.

Flourishes Release Week ~ Bees & Blooms!

Yippee!  It's day two of Flourishes' Release Week!  Today's stamp release is TO-DIE-FOR!!!  It's called...
BEES & BLOOMS!

The minute I saw this stamp set, the image that came to my mind was TOILE!  

Toile is the name of a fabric that entered the English language around the 16th century from a French word meaning "linen cloth" or "canvas"—particularly cloth or canvas for painting on. The word toile can refer to the fabric itself, a test garment (generally) sewn from the same material, or a type of surface decoration (traditionally) printed on the same fabric.

So I began by die cutting 3 nesting rectangles using my Spellbinder's dies out of Flourishes Classic White Cardstock. I created a my card layers using the same idea as the Splitcoaststamper's tutorial, "Triple Stamping".  I stacked my 3 layers on top of each other and began stamping using my favourite black ink, Memento's "Tuxedo Black".  I inked up my edges using my new favourite Ranger Distress Ink, "Pumice Stone".

Bee Toile Noir
I made my card a tri-fold card so I decorated the middle panel using the same cardstock and inks and my inside panel as well.

Middle Panel
I "taped" the ends of my white seam binding ribbon so I could easily thread it through the holes of my card front.  I used a simple piece of coordinating colour washi tape. Simple and easy to do!

In order to close my card, I created a simple ribbon closure. Here's how I did it...
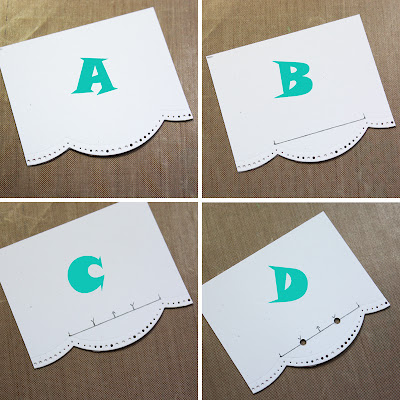
How to Create a Punch Template:
A)  I took a scrap piece of cardstock and die cut the same shape where I want to locate my ribbon closure.
B)  I drew a line so my punched holes are lined up evenly.
C)  Then I found the center point on the line and then I chose to mark 2 evenly spaced lines from my center point.
D)  I used my 1/8th hole punch and punched 2 holes on my evenly spaced marks.

E)  Next I took my punch template and used it to punch my actual card.  It makes it so easy because I never have to erase any pencil marks on my project and I can make it just the way I want BEFORE I punch my actual project!  So helpful!!!

Make sure you check out all of the Senior Design Team member blogs.  They always have some amazing cards and projects using our new stamp sets...
Happy blog hopping!!!

~ Ally ~

Supplies:
stamps: Flourishes (Bees and Blossoms)
cardstock: Flourishes Classic White & Black Cardstock

die cut shapes:  Spellbinders
ink: Memento, Ranger

ribbon: seam binging

washi tape:  My Mind's Eye
pearls: KaiserCraft.

Flourishes Release Week ~ Spring Blossoms!

Hello stampers!  This week is Release Week at Flourishes.  And boy oh boy!  You won't want to miss any of our new stamps this month!

If you know me, you'll know that I love to make interactive cards. And this week at Splitcoaststampers, the "Try a New Technique" Challenge is all about creating cards that MOVE!!  So I decided to create a Suspension Card.  You check out the tutorial HERE.

Sending Love
I started by creating a simple white cardstock card base using Flourishes Classic White Cardstock.  I die cut one edge for some additional visual detail.  I created my simple patterned paper card front and the die cut a circle out of the front.  Then I adhered it to a black mat using Flourishes Classic Black Cardstock and die cut a scalloped circle inside the original circle.  I also cut the card base using the same scalloped circle so the card base has a hole through it.

I stamped my mini spring bouquet onto Flourishes Classic White Cardstock using Memento "Black Tuxedo" ink and then coloured it using Copics.

For my card I used the following Copic Collections today:
Both of the greetings on my card are from this beautiful stamp set; "Spring Blossoms"!  Here is the reverse side of my suspension card...


Make sure you check out all of the Senior Design Team member blogs.  They always have some amazing cards and projects using our new stamp sets...
Happy blog hopping!!!

~ Ally ~

Supplies:
stamps: Flourishes (Spring Blossoms)
cardstock: Flourishes Classic White & Black Cardstock
patterned papers:  Authentique
die cut shapes:  Spellbinders
ink: Memento, Copic
ribbon:Offray
other: thread, dental floss.

Timeless Tuesday #215 ~ Around the House!

Hello fellow Flourishes fans and stamp lovers!  Happy Tuesday!  Are you ready for another fabulous Timeless Tuesday Challenge over at Flourishes?!?  I sure am.

This week, our super talented hostess Broni is challenging us to create a card or project using or including something from around the house (FTTC215).  You can as creative with this topic as possible!  There are so many cool possibilities... safety pins, band aids, stick pins, tape... the sky is the limit!!

For my card this week I started with some paint.  Paint in white, teal and grass green.  I put a few small blobs on my craft mat.

Then I took a piece of Saran Wrap (a household item!!) and crumpled it into a ball.  Then I pressed the Saran Wrap into the blobs of paint.  I lifted my ball and turned several times before applying it to my paper.

I took a piece of Flourishes Classic White Cardstock and dabbed my paint dipped Saran ball all over it.  I made sure to press the paint into the paper in several different directions so I wouldn't get any true pattern to my paint.

I let my paint dry and then I took some Versamark ink and stamped on my hummingbird and plants from the "Humming Along" stamp set.  I sprinkled on my fine silver embossing powder and heat set my image. I then added a little bit of the same paint colours I began with to my image to make them pop!

Next I took a piece of scrap cardstock and wrapped some aluminum foil around it.  I secured it to the back side using some tape.
 

Then I ran the foil wrapped cardstock through sandwiched in a fun hexagon shaped embossing folder.  Isn't that cool?  The cardstock allows for the foil to remain rigid and keep the embossed design.  It's super fragile so be careful when using it!

And here is my remaining card, using the Saran Wrap back ground, my fun stamped image and my foil embossed cardstock!

Just Humming Along
To finish off the front of my card I used some fun Sheer Line Edge Teal and White Ribbon.  I added a fun "Crystal" coloured KaiserCraft Sparklet to the center of my simple bow!

DON'T FORGET ABOUT... our call for another "Friend of Flourishes" design team member!  The deadline is fast approaching so don't delay!  Get your application in today!  For call details, CLICK HERE!

Now... check out what my fellow design team members have created for Broni's fabulous challenge this week...

Allison Cope
Broni Holcombe
Cindy Haffner
Deborah Anton
Denise Marzec 
Debbie Marcinkiewicz, our April guest designer

We can't wait to see what you create with our challenge this week!  Have fun!!

~ Ally ~

Supplies:
stamps: Flourishes (Humming Along)
cardstock: Flourishes, Bazzill

ink: Versamark
embossing folder:  Spellbinders 
paint:Making Memories, Delta
ribbon:Flourishes
tools: Cuttlebug
gems: Kaisercraft
other: thread.

Flourishes Announces a Designer Call!

With Maki’s departure from the Timeless Tuesday Team comes a WONDERFUL opportunity for one super talented designer!


Well, it could be YOU!!!!!  Do you love to stamp?  Do you love to create cards, layouts and other fabulous projects?  Then we want YOU!

For the first time in Flourishes’ history, we are having a design team call for our Friends of Flourishes Team. If you are a creative person that loves to stamp then this is the job for you!  Our newest team member will be expected to post on their blog every Tuesday and will be given a new challenge every week to create with showing off the beautiful versatility of Flourishes stamps!  Members will not only receive product from the Flourishes store but a discount as well. The person chosen will be given all the specifics on all the perks when they are invited to join the team. Do you love to create with beautiful images and would you like to be a part of a friendly, energetic and talented team? Now is your chance!

To apply, simply email me at flourishes@bresnan.net with the subject “FOF Design Team Call” in the subject line.

HOW TO APPLY FOR THIS FRIENDS OF FLOURISHES CALL!

  • Simply send an email sharing a little bit about yourself – your name, where you are from as well as your blog address. Why would you like to join our team? What do you think you could bring to this team?
  • Do you have any Flourishes creations you would like to share? If so, simply provide links to your top three creations. Don’t have any Flourishes stamps? Please send us a link to your three favorite cards!
  • Are you on any other design teams or has your work been published? If so, please share!
This call is for designers located in the United States and Canada only.  Deadline for your application is April 25, 2013.  We hope to be able to pick the winner by the first few days of May so that our new designer could join us for the first May “Timeless Tuesday Challenge” on May 7th. Good luck!!!!

~ Ally ~

 
09 10