Showing posts with label Flourishes Silhouette Cut Files. Show all posts

Timeless Tuesday ~ Touch of Gold!

Howdy all!  It's time for another Timeless Tuesday Challenge over at Flourishes!

This week the lovely Katie is our hostess and she is challenging us to use a TOUCH OF GOLD this week!

For my card this week I grabbed some Easter stamps to try and get ahead on making those for my family and friends this year.

I started by using my Silhouette and cutting some Classic White Cardstock using the Easter Wishes Silhouette Cut File.  Then I stamped my egg image from the corresponding stamp set, Easter Wishes, using Memento "Tuxedo Black" ink.


Next I took the beautiful Perfectly Pierced Classic Frames Die and cut a piece using white cardstock again.  Then I using some Versamark ink and stamped the sweet gingham image from the  Berry Sweet Frames stamp set onto my embossed cardstock and added some gold embossing powder.

Too add further gold touches to my card, not only did I emboss with gold powder but I also added some gold pearls, and I added some gold pen detail to edges of all of my patterned papers and also the edges of the bow on the egg too!

Then I coloured in my images using Copic Markers:
B91, BG10, BG53, R11, R12, 
Y000, Y00, Y11, YG17, YG21 and YG23.

Here is a close up my gold embossing and coloured Easter egg image...


I used the sketch from Mojo Monday, #337, for my card design today....


Next week will be my final week with Flourishes so make sure you take a moment and not only take a moment to leave some love on my fellow design team blogs but make sure to play along with us too!  Good luck everyone!

Come and join along with us this week for our "touch of gold" challenge!  Be sure to visit the rest of the DT’s blogs and leave them a little blog love too….
Thanks for stopping by!

~ Ally ~

Sponsored by Flourishes LLC

Supplies:
stamps: Flourishes (Easter Wishes, Berry Sweet Frames)
cardstock:  Flourishes Classic White
patterned papers: Carta Bella (Sew Lovely), Bo Bunny (Happy Tails)
die cut shapes: Flourishes Perfectly Pierced Classic Frames
ink:  Memento, Copic Markers, Versamark
ribbon:  American Crafts
gold pen: Sakura
tools:  Silhouette
gold pearls:  Recollections
other: embossing powder.

Lockets of Love

Free for All Friday with Border

Friday has come around again! We hope you have some fun plans for the weekend, and even better, some creativity planned in there. Our Design Team has pulled together some beauties again today with items in the store that are now discounted even more! Woo hoo! It's week three of our six-week Gambler's Sale and we're stepping up the discount again -- this time to 30% off store wide! With that kind of discount, some of your favorite sets on your wish list won't last long!
 
Why is this sale a gamble? Well, ALL of the items now in the store will be going, going, gone -- never to return again. So, if you see something you really want -- buy it now or take a gamble to see how low the price will go! Like we said, this week everything is 30% off with the code GAMBLERS30. Just use that code in the coupon box at the time of check out to get 30% off your entire order, even on already reduced sale prices! Each Monday, between now and February 24th, we'll be adding another 10% off! So that means this coming Monday if you gamble longer...the discount is 40% off.

While you're shopping, be sure to check out this special deal!
Our MYSTERY BAGS were WILDLY popular in the past and so, why not bring them back? Each bag is valued at roughly $40 but... you pay only $25!!! Each bag has two stamp sets -- YES TWO! One is an unpackaged set that we cannot sell because it doesn't have an index sheet. But, it stamps perfectly and would love a new home! Each bag also has a fun tutorial sheet showcasing a card or technique. Add in a few yards of ribbon and an embellishment and that is what is in each Mystery Bag. It's one heck of a bargain! Click HERE to visit the store and pick one up today!

With Valentine's Day so near, I thought I'd share another card for that with you today!

I tell ya... this card was a true experiment... experiment in my patience!  LOL!  I struggled with the elements and layers for hours and finally gave up and settled For this end result.  It truly isn't my favourite creation... by far but I do like the concept of it.  Maybe I'll give the whole hanging lockets thing another go soon.


For all the lockets, I used the super, duper cute "Simply Charming" stamp set.  I actually cut them out using the their accompanying "Simply Charming" Silhouette Cut file, using Classic White Cardstock and then I found some totally cute Valentine's themed papers and knew I had to use them too, so I stamped each locket image again with Memento "Black Tuxedo" ink onto the individual patterned papers and fussy cut them and attached them to my cut files.  I stamped the cute little "Will U B Mine?" sentiment from the "Tokens of Affection" stamp collection using Memento "Rhubarb Stalk" ink. One them even includes the definition for "heart"... awwww!


Then I took some Silver Metallic String and "hung" them on the strands (popped them up with foam) to make them appear in mid-air.  I strung them within the window I cut in the patterned paper and cardstock and voila... a Valentine was born!

Now here’s some of our Senior Design Team with fabulous things to show to you! If you love their creation and want to make one just like it -- don’t gamble too long!
Have fun shopping! Don't forget the code GAMBLERS30 -- and remember that once these items are gone they will be gone forever!

~ Ally ~

Sponsored by Flourishes LLC

Supplies:
stamps:  Flourishes (Simply Charming, Tokens of Affection)
cardstock:  Flourishes Classic White Cardstock
patterned papers: Pebbles (Yours Truly)
embossing folder, die cut shapes: Spellbinders
ink: Memento
cut files: Flourishes Silhouette Files
silver string:  Flourishes
tools: Silhouette
gems:  Doodlebug Designs.

12 Weeks of Holiday Cards - Week 8 - Sorry... it's REALLY Late!

Welcome to Week 8 of my 12 Weeks of Holiday Cards!

Each Wednesday (apparently not last week!  LOL!) until Christmas, I will be sharing with you a fun and simple holiday card fit for a quick assembly.  I will share tips, tricks and techniques along the way.  So join me...

Make 2 for 1!

Today I'm sharing an EASY and fun card making tutorial on the Scrapbook & Cards Today blog!

I'm sharing a tutorial on how to maximize the use of your scrapbook supplies and make beautiful holiday cards too!  Check out how I made these snowy creations by click the link HERE!


Happy stamping everyone!

~ Ally ~

Timeless Tuesday ~ Pick a Sketch!

Howdy stamp fans!  It's Tuesday... time for another fabulous Timeless Tuesday Challenge with Flourishes today.

This week I get to be your hostess!  Hooray!  So I decided to go with a sketch... well, actually TWO sketches.  Your challenge this week is to pick a sketch and create a card or project using the design...

So here is the card I created using the sketch on the right side...

Partridge in a Tree

I began my card today by cutting out the large topiary tree shape using the Holiday Topiary Silhouette Cut File from Classic White Cardstock.  Then I stamped my tree image from the "Holiday Topiaries" stamp set  using Memento's "Black Tuxedo" ink and coloured it using the following Copic Collections:
Next I cut out the Labels Twenty-Eight shape from Spellbinders, leaving my white cardstock in the die and stamped my background using the "Love & Joy" sentiment from the same "Holiday Topiaries" stamp set using Memento's "Espresso Truffle" ink.  Then I airbrushed it with a variety of Copic's from the image.

I created my card base and matted all of my patterned papers and added a little soft yellow button and twine.

Before you go too far, be sure to visit the rest of the DT's blogs, as well as our November Guest Designer and leave them a little blog love. In return, they will amaze you with their beautiful work...
Thanks for stopping by!
~ Ally ~

Sponsored by:  Flourishes LLC

Supplies:
stamps: Flourishes (Holiday Topiaries)
Silhouette cut files: Flourishes
cardstock:  Flourishes Classic White
patterned papers: Echo Park (Reflections Christmas)
die cut shapes: Spellbinders (Labels 28)
ink:  Memento, Copics, Ranger
tools: Copic Airbrush, Silhouette
button:  Flourishes
twine:  Darice
other: thread.

Grab a Cup!! ~ Our November Release Challenge is Here!

November brings crisp, cool days that might find you heading into your favourite coffee shop to grab a cup of warmth, and dwell in that inviting aroma that only a cozy cafe can bring.

Image

This month we’re inviting you to “Grab A Cup” with us on the Flourishes Senior Design Team and be inspired by this fantastic photo as you create something equally warm and inviting.

Next week we’ll be bringing you our November edition of new Flourishes stamps, and we can’t wait! They’re absolutely fabulous!  Because we know you want a chance to win these great sets, “Grab A Cup” and be inspired by this great coffee and treats photo as you create.    Play in the challenge and you could WIN our whole November Release!

Hey stamp lovers! I tell ya, if I could find those exact mugs and plates I'd be all over them!  They would match my kitchen and dining room perfectly!!!  I hope you've grabbed your own cuppa joe this morning because I know you're going to hopping along and gawking at all the amazing creations my fellow designers have created for you today!

For today's card, I used a variety of aspects from the challenge photo... but especially the colour of the dishware.  Here's my creation using our inspirational photo...
I began by die cutting an oval of Classic Ivory cardstock and stamping & masking the three mugs from the fabulous "Mix n'Mugs" stamp set using Memento "Rich Cocoa" ink.  I then coloured them using the following Copic Collections:
I also masked off my 3 mugs and splattered them with some Copic brown tones using my Copic Airbrush to get that spotted, pottery look.  I also added some super fine white paint dots using some watered down white acrylic paint and a toothbrush.


Next I matted my oval with a scalloped oval of "Rain" cardstock from the Emerald Coast Color Made Easy cardstock collection.  If you super closely at my oval, you can see a couple of pies too... they were stamped using Memento's "Desert Sand" ink from the "Fresh Baked" stamp set.

I cut another piece of Classic Ivory cardstock and stamped some subtle snowflakes from the "Handmade Snowflakes" stamp set in a blue ink and Memento's "Desert Sand" ink.  I distressed the edges and inked them up with "Desert Sand"  and Ranger's "Vintage Photo" Distress ink.  I then matted it with a piece of "Calypso" cardstock from the Emerald Coast Color Made Easy cardstock collection.

I decorated the front with a piece of May Arts' Turquoise Striped Twill, a bow of "Argentina" Seam Binding ribbon and a cut snowflake using the Handmade Snowflake Silhouette Cut File with an Emerald Coast Button & some jute.


I finished off the inside of my card using the same subtle snowflakes from the "Handmade Snowflakes" stamp set in a blue ink and Memento's "Desert Sand" ink as on the front of the card.  I also stamped my "Let It Snow" from the "Sentimental Christmas" stamp set using Memento "Rich Cocoa" ink.


I hope you like my little coffee inspired card today!  Come along and join in the fun!  Here are the official rules...

THE OFFICIAL RULES:


  • Simply create a card or project inspired by the photo above.

  • Entries need to be in by Friday November 15 at 5 PM EST.

  • Those entries using Flourishes Stamps will be counted twice.

  • You must link your creation on our InLinkz Widgit to be counted

  • You must have a link to our challenge in your blog post or gallery post

  • Please DO NOT combine challenges from other sites or locations.  Only those entries that don’t combine will be in the running.  Because this challenge means winning new Flourishes sets we want to see your beautiful creations made specifically for this challenge.

  • If you upload to SCS please use the keyword FLLCNOV13 .

  • We’ll announce the winners on Saturday in our Winner’s Circle Post here on the blog on Saturday November 16th, so check back then to find out if you are a winner!
  • Thanks for stopping by today and we look forward to seeing what you create!  We’ll see you here on Wednesday November 13th when our delicious November Sneak Peeks start!

    Enjoy the inspiration and creating!

    And now for some wonderful Grab a Cup Inspiration, our Design Team has some beauties to show off to you:


  • Allison Cope -- you are here!

  • Happy hopping everyone!

    ~ Ally ~

    Sponsored by Flourishes LLC

    Supplies:
    stamps:  Flourishes (Sentimental Christmas, Handmade Snowflakes, Mix n'Mugs, Fresh Baked)
    cardstock:  Flourishes (Classic Ivory, Emerald Coast Collection)
    Silhouette cut files, button, twill, ribbon:  Flourishes
    woodgrain cardstock:  Elle
    patterned papers: My Mind's Eye
    die cut shapes: Spellbinders
    ink: Memento, Copics, Stampin' Up!, Ranger
    tools:  Silhouette Cameo, Copic Airbrush, paper piercer
    white paint:  Delta
    jute:  Darice
    other: thread.

    Timeless Tuesday ~ Fussy Cutting Fun!


    Hey hey hey stampers!  Welcome to another fabulous Timeless Tuesday Challenge with Flourishes!

    This week our lovely hostess Jenny has a cool challenge for us!  This week's challenge is to...


    For me there is nothing better than sitting down with scissors in hand cutting out detailed stamped images - it's like therapy - but today... I cheated!!  LOL!  Today, for my card creation, I used the new stamp set "Star of Bethlehem" stamp set and I used it's accompanying silhouette cut file! Yup... having cut files for all my gorgeous stamp sets is awesome and makes it SO EASY to put together a new card.  

    For my cut file cardstock, I used Classic White cardstock.  This cardstock "cuts like buttah" on my Silhouette Cameo! *Sigh!*

    I used my new favourite neutral cardstock, "Cinder" from the "Cool Neutrals" Color Made Easy cardstock collection.  It matched perfectly to my holiday themed patterned papers!

    My card today is a Surprise Pop-Up style card.  You can find a quick written and video tutorial on this card style HERE at Splitcoaststampers.  Here is the inside of my card front with the tag pulled up... 


    I stamped my greeting in "Black Tuxedo" ink from Memento with a green inked floral too.  And at the top of my tag, for my "Merry Christmas", I used Versamark ink with white embossing powder.  All of these images and sentiments are included in the "Star of Bethlehem" stamp set!

    I even decorated the inside of my card too...


    I also created my card for this week's Christmas Card Challenges: #47 - use flowers and for the Splitcoaststampers Hope You Can Cling To challenge: HYCCT1308 - "It's a Cover Up!"; a hidden message challenge. 

    Thanks for checking out this week's Timeless Tuesday Challenge today!  Please be sure to check out some wonderful inspiration from our extremely talented team:
    Happy stamping this week everyone!

    ~ Ally ~

    Sponsored by Flourishes LLC

    Supplies:
    stamps:  Flourishes (Star of Bethlehem)
    cardstock:   Flourishes Classic White, "Cool Neutrals" Collection, Bazzill 
    patterned papers, stickers:  Echo Park ('Tis the Season)
    die cut shapes:  Spellbinders
    ink:   Memento, Stampin' Up!
    cut files:  Flourishes
    tools:  Silhouette
    ribbon:  misc.
    silver string:  Flourishes
    silver pearls:  Recollections.

    Flourishes Sneak Peek... Handmade Snowflakes!

    Hi  all -- time for day two of Flourishes fabulous sneak peeks for October! Today, it's all about the whimsy of those winter months when the temperature drops and the flakes start to fly!


    These whimsical snow flakes are just ready and waiting to be added to all of your winter and holiday themed creations! These hand-drawn flakes, created by Marcella Hawley, offer a dash of charm and style. This 4" by 6" set also offers three scripted sentiments that will give your cards the perfect punch.

    And, what's more? This set is taking center stage in Flourishes brand new Class In A Box Kit for October! Here's a peek!


    This rustic card kit with country charm comes with the stamp set, plus all the pre-cut paper, embellishments, trim and ribbon needed to make 6 cards -- two each of three designs! Just stamp, and put these beauties together. It's quick and easy card inspiration delivered right to your door! When you're done, save the full-color, glossy instructions to make all of these cards on your own in the future! This kit also features the 6" by 6" paper pack by Bazzill called Nordic Pines. What fun!

    Flourishes has some amazing holiday themed paper packs, like the "So This is Christmas" collection by Carta Bella...
    ...so I knew I had to use it for today's card!

    I know, when you think snowflakes, you think light, white or maybe a soft blue... right?  Nope... I decided to match my snowflakes with this cute paper line and go with a dark rich red and light beige.

    I began my easel card by cutting out a card base of Classic White cardstock and then a matching mat of beautiful "Patch" cardstock from the Color Made Easy "Pistachio" collection.  The dark green matched perfectly with the patterned paper!  I cut a scalloped oval from the green cardstock and white oval from Classic White cardstock and then stamped them with a variety of beautiful snowflakes from the "Handmade Snowflakes" stamp set using some "Desert Sand" Memento Ink.  I overlaid the white oval with a die cut vellum to soften the design.
    Then I loaded up my Silhouette machine and cut 3 different sized snowflakes and the Believe shape using the Handmade Snowflakes Silhouette Cut File (to be revealing in the Flourishes Store on Friday!).  I stamped the sentiment and the largest and smallest snowflakes using Memento's "Rhubarb Stalk" ink and the medium sized snowflake in the "Desert Sand" Memento Ink and then layered them using foam tape.

    Here's a quick peek of the card in its open position...

    And here's the complete inside of the easel card with lots of fun snowflakes to match the front!


    I hope you enjoyed my snowy inspiration today.  The Design Team has created some wonderful creations showing off these Handmade Snowflakes! While you're out and about, don't forget about....
    Mystery Blogger Graphic

    Hidden among the Design Team’s blogs today is our Mystery Blogger of the day. Comment on her blog and you could be chosen to win today’s set! The more you comment, the better your chances of winning!

    Do you want to win Flourishes' October Release?

    • If you would like a chance at winning all three of our soon-to-be released October sets…you can play in our Christmas with a Twist Challenge – we will have multiple winners there! Deadline for entries is FRIDAY October 11th at 5 PM EST. Check out the link for the official rules!
    • All three of our October sets can be pre-ordered now, even before you see them all! Take advantage our New Release Bundle and get 10% off when you purchase all three sets together in a bundle. This discount will only be available through October 18th, so you have to act fast! 
    • Keep in mind, all of these sets will be live first thing Friday morning in the Flourishes store along with the coordinating cut files for this release. 
    • And, don't forget to come back to the Flourishes Blog Saturday, October 12th for the Winner’s Circle where we’ll announce all of our winners of this weeks’ challenges!

    Be sure to stop on by tomorrow when we take the lid off our October release and show off a striking botanical beauty that is ready to shine this holiday season!

    ~ Ally ~

    Sponsored by Flourishes LLC

    Supplies:
    stamps: Flourishes (Handmade Snowflakes)
    cardstock:  Flourishes Classic White, "Pistachio" collection
    patterned papers: Carta Bella 6x6
    die cut shapes: Spellbinders
    ink:  Memento
    pearls:  Doodlebug
    other: thread.

    Peace & Joy: Silhouette Cameo Happiness!

    I couldn't resist creating some fun holiday cards to share with you today.  I was pondering how I wanted to best show how versatile the beautiful "Peace and Joy" stamp set is so I pulled up my Peace & Joy Silhouette Cut File and began to design a simple panel for a cute card front. I designed the panel to capture part of each word from the beautiful stamp set; hanging part of the image in the air.
    Here is the first card panel I designed using the word and stamp "JOY".  See how the word hangs over the top of the panel?  The dark green is all one piece of paper and makes for a really simple and cute card front.
    I wrapped my card panel using some pretty "Moss Green" Seam Binding Ribbon from the "Pistachio" Color Made Easy collection. My A2 card base is made from "Sea Salt" cardstock from the "Emerald Coast" Color Made Easy cardstock collection.  It matched perfectly to the greeny-blue in the striped patterned paper I used.

    For my second I card I started with a card base made from "Patch" cardstock from the "Pistachio" Color Made Easy cardstock collection.  Once again, I designed a panel to fit the stamped word "PEACE" from the beautiful "Peace and Joy" stamp set so I pulled up my Peace & Joy Silhouette Cut File again and designed a longer panel to fit my stamp.
    Once again, I wrapped my card panel using some pretty "Moss Green" Seam Binding Ribbon from the "Pistachio" Color Made Easy collection and added a few mini pearls to finish off my card.

    I used a YG17 Copic Marker from the Green Grass Copic Collection to add a little bit of darker green to the stamped and embossed holly embellishments for both cards.

    Thanks for joining me today!  I hope my cards inspire you to pull out your stamps and cut files and have a go at creating something fun.

    Ally.

    Sponsored by Flourishes LLC

    Supplies:
    stamps:  Flourishes (Peace and Joy)
    cardstock:  Flourishes Classic White, "Pistachio" & "Emerald Coast" collections
    patterned papers: Simple Stories (December Documenter)
    die cut shapes: Flourishes Silhouette Cut Files
    ink:  Versamark, Copic
    embossing powder:  Stampendous!
    ribbon: Flourishes
    tools:  Silhouette Cameo
    pearls:  Recollections, Doodlebug
    other: thread.

    Timeless Tuesday ~ In Distress

    Howdy Flourishes lovers!  It's the LAST Tuesday before school begins for us!  My munchkin is off to Grade 3 this year and Mama is certainly ready for quiet days of endless creativity!!

    For this week's Timeless Tuesday Challenge at Flourishes, our lovely hostess is Deborah this week!  Deborah is challenging us to...

    ...create a project with DISTRESSING!  
    Let's get "In Distress"!
    FTTC235

    I had a lot of fun with this challenge this week!  Here is what  I created for Deborah's fabulous challenge this week...

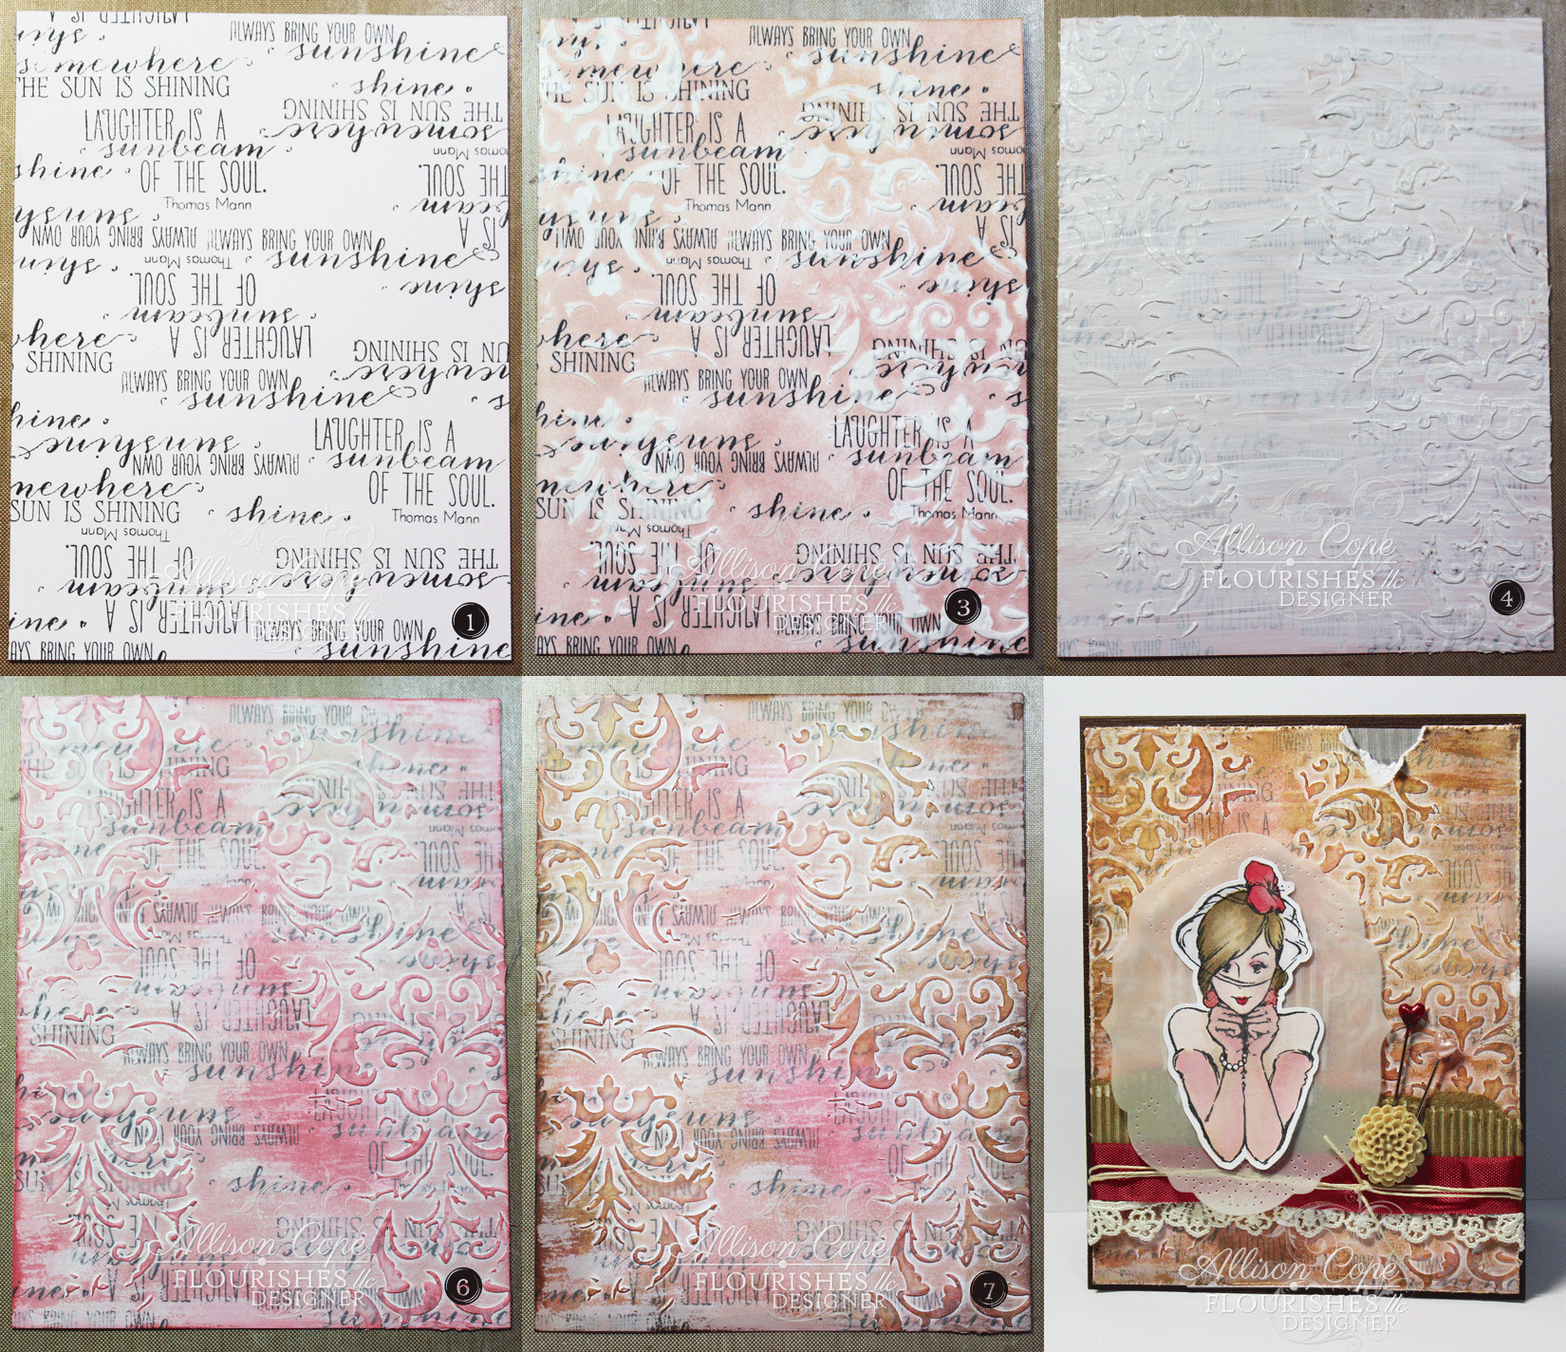
    Here are the steps I used to create my distressed back ground...

    Each number corresponds to the numbered image above:
    1. I took a piece of Flourishes Classic White Cardstock, using Memento "Black Tuxedo" ink, I stamped 4 of the different sentiments from the new "Chrysanthemum" stamp set all over it.  I even stamped them upside down for interest! 
    2. Then I used a stencil and applied some areas of 3D molding paste to give the card front texture.
    3. Then I rubbed on some Ranger "Tattered Rose" ink using an Ink Blending Tool.
    4. Then I applied a heavy layer of gesso using a brush.
    5. While the gesso was quite wet, I took a damp sponge and wiped off some of the gesso to reveal the colour and stamping.
    6. Next I took some dark pink Ranger ink; rubbing it in some spots and not others.
    7. Then I added some "aging" to the back ground with some darker brown ink.
    8. And finally, I added some fun metallic bronze paint to the raised portions and edges of the back ground for that touch of sparkle!
    For my focal image I used the rather fabulous chic lady in the veil from the "Glamour Girls" stamp collection!  I cut my shape from Flourishes Classic White Cardstock using the amazing Glamour Girls Silhouette Cut File, and then I stamped my image using Memento "Black Tuxedo" ink.  I coloured her in using all of the fun Distress Inks I used to create my back ground!

    To give her some focus, I popped my fabulous gal up onto a vellum cut of our Perfectly Pierced Victorian Ovals!   I love how the vellum allows you to peek at the back ground behind!  

    For a touch of colour and texture I wrapped my card front with "Basque Red" Seam Binding Ribbon, a piece of White Floral Venice Lace and quite couple of loops of the Ivory Jute!

    Now... take a moment and check out my fellow DT member's creations this week...
    Thanks for stopping by!  Enjoy your journey checking out all the fabulous distressed creations today!~ Ally ~

    Sponsored by Flourishes LLC

    Supplies:
    stamps: Flourishes (Chrysanthemum, Glamour Girls)
    cardstock: Flourishes, Bazzill
    corrugated cardboard: K & Company
    die cut shapes:  Flourishes/Spellbinders
    ink:  Memento, Ranger
    paint:  Ranger
    ribbon/lace: Flourishes
    3D molding Paste: American Traditional Designs
    tools:  Scor-Pal
    other:  vellum, pins, flower.
     
    09 10