Introducing... Pinwheels & Popsicles!

Hasn't this been a fun July Release? I know you've enjoyed it as much as we have in bringing it to you, but it's not over quite yet! We're so excited to bring you one more stamp set, and it's a fantastic new Birthday and Celebration set today! We think it's the cutest thing ever, and we know when you see it you'll agree!  

Introducing.... 
 PinwheelsGraphic 

Light it up and help those in your life to wish big! This set is perfect to send a little note of celebration in an envelope. From "cool" images to "sweet" sentiments, Pinwheels and Popsicles illustrated by Marcella Hawley is the perfect birthday stamp set! Set measures 4" by 6" and offers five main images and seven fun-filled coordinating sentiments.
 Mystery Blogger Graphic 
Let us show this set off to you with the Senior Design Team, and remember today is your last chance to find out who is the Mystery Blogger in the Design Team. Comment on that Design Team Member's Blog and you could win today's set!

For my project today, I needed a last minute card and gift bag for the two gifts for my son's teachers.  So I went to the dollar store and grabbed two bright, polka dot gift bags to put their gifts in.

I started off by making two mini tags for the gift bags so I could make sure the right teacher, got the right gift.

I made two mini card bases, approximately 2 1/4 x 2 1/4, using Flourishes Classic White Cardstock.  Then I stamped the cute little popsicle image from the new Pinwheels & Popsicles stamp set using my favourite ink, "Tuxedo Black" ink by Memento. 

I created a quick mask and placed it over my popsicle image, I masked the edges of each card and then stamped the cute gingham back ground from the Berry Sweet Frames stamp set right over top.  For one mini card I used Memento "Rose Bud" and for the other "Lilac Posies". Next I stamped my popsicle image onto some fun green paper, fussy cut each one out and adhered it to my mini card.  I tied each card on using some Metallic Silver String.

Next I wanted to make two very simple cards to tuck inside each gift bag.

First I made a A2 card base using Flourishes Classic White Cardstock. I embossed 3/4 of each card front using the a double sided embossing folder.

Then I die cut two Classic Large Ovals using Spellbinder dies, and stamped the adorable row of Chinese lanterns from the new Pinwheels & Popsicles stamp set using my favourite black ink again.


I popped each oval back inside the die and airbrushed the sky using Copics.  I didn't bother to mask off my lanterns since I knew I was going to paper piece them with patterned paper.

Next I stamped each lantern twice on to scraps of fun and bright patterned papers.  I fussy cut each lamp out and adhered it to the correct image.

Then I took some more scraps of the same patterned papers and cut out banners to drape below my ovals.

Finally I die cut two banners, Copic airbrushing each one in a corresponding colour and stamped the fun sentiment on them.

Viola... my gifts were finally done!!

I used the following Copic Collections for my project today:
B21, B23, Y15 and RV14.


Thanks for joining me today!  Now... off you go and check out all the other stunning creations using this awesome summery party stamp set!

DO YOU WANT TO WIN OUR ENTIRE RELEASE?

If you would like a chance at winning all four of our now released July sets…
  • You can play in our It's Sketchy Challenge– there will be multiple winners there! Deadline for entries is TODAY at 5 PM EST. OR, play along with the gals for this week's Timeless Tuesday Challenge! Check out the links for the official rules!
  • All four of our July sets are NOW AVAILABLE and you can check them out HERE. Take advantage our New Release Bundle and get 10% off when you purchase all four together in a bundle. And, for even more creative options here's the coordinating cut files for this release. Thank you for joining us for this month's New Releases and all the great fun! We can't wait to see what you create with this month's sets!
  • Join us back here on the Flourishes Blog tomorrow for the Winner's Circle where we'll announce all of our winners of this weeks' challenges!
~ Ally ~

Sponsored by:  Flourishes LLC

Supplies:
stamps: Flourishes (Pinwheels & Popsicles, Sweet Berry Frames)
cardstock: Flourishes Classic White Cardstock
patterned papers: Echo Park
die cut shapes: Spellbinders
ink: Memento, Copic
embossing folder: Spellbinders.

Introducing... Anemones!

There are some sets that are so touching and fit a purpose that you really needed. Something that conveys those messages of concern and care that is really meaningful, and we think this is one of those beautiful sets.  

We're please to introduce to you....

 AnemonesGraphic 
The latest offering from artist Sam Pickard is a perfect stamp set to have on hand to let your friends in need know that you care. This 4 by 6" set features a beautiful bunch of Anemone flowers, a single stem, plus five beautifully scripted sentiments all with a calm and caring message. We think you'll love it and we're excited for the Design Team to show you what they have in store today...

Mystery Blogger Graphic 

There's another Mystery Blogger to find today. Hidden among the Design Team's blogs today is our Mystery Blogger of the day. Comment on her blog and you could be chosen to win today's set! The more you comment, the better your chances.

With only a few days left of school for my son, I knew I had one last teacher's gift to make.  I wanted it to be simple and easy so here's what I came up with...

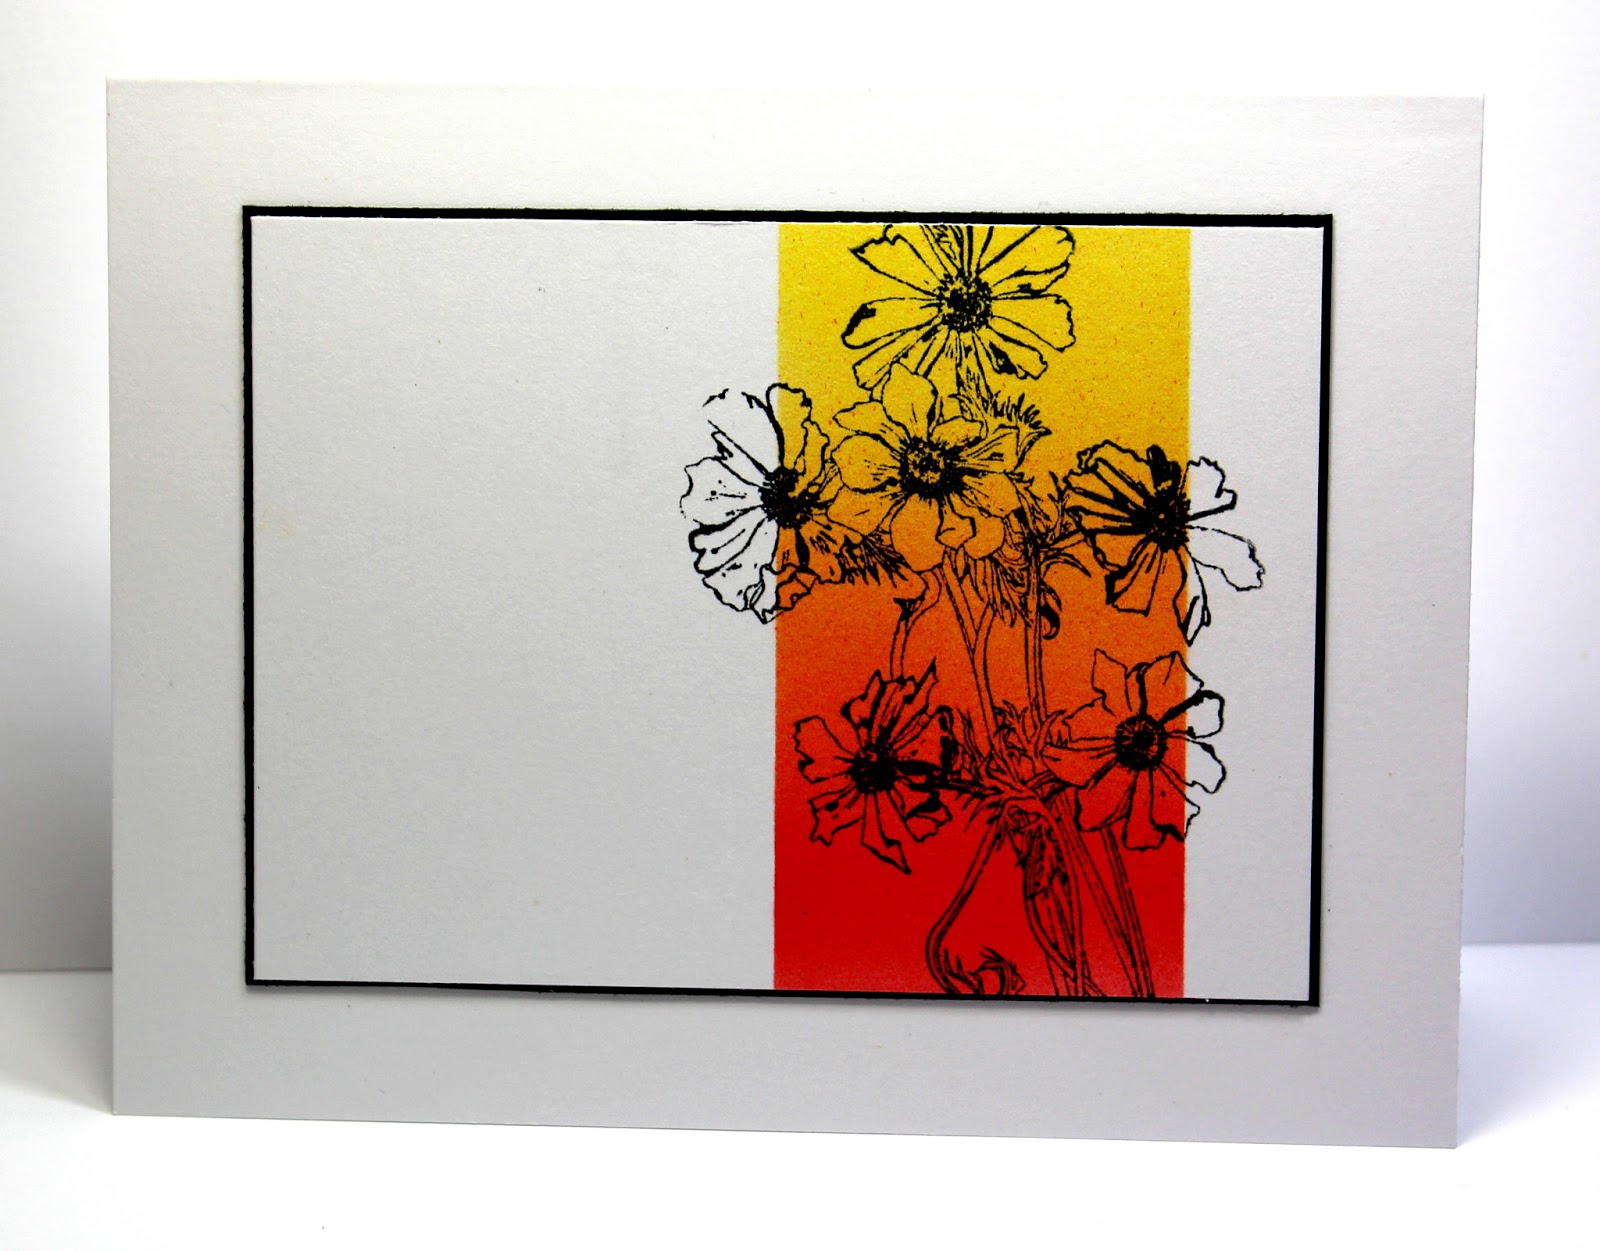
I started with a rectangle of Flourishes Classic White Cardstock (approximately 4 1/4 x 3).  I used a large Post-It Note to mask of a section of the rectangle, then I used Copic Y15 and air brushed it on, towards the top of the masked area.
 

Then I took Copic YR16 and airbrushed it towards the center of the area.

Then finally I took Copic R14 and airbrushed it towards the bottom of the masked area.  Then I carefully removed the masks.

Then I took some Memento "Black Tuxedo" ink and stamped my Anemones over top of the air brushed areas.  I wanted some of the flowers to pour over into the white space.  I backed each panel with Flourishes Classic Black Cardstock and added it to a Flourishes Classic White Cardstock card base...  so simple but pretty!

Each card is slightly different...  Some of the airbrushed areas are larger than others.
 Some have single Anemones on them...
 ...and some have the large bouquet image on them!
For the final part of my gift set, I made a simple A2 Card Box to send them in.  You can see the tutorial on how to make that here at Splitcoaststampers.

For the focal image on my box top, I used the beautiful Tailor-Made Classic Keyhole Die and some gorgeous "Tiger Lily" seam binding.  I also used some African Daisy cardstock from the Color Made Easy "Sunflower" Collection to create the base for my gift box.

Now... check out what the rest of my fellow designers have created using the fabulous new Anemones stamp set!

DO YOU WANT TO WIN OUR ENTIRE RELEASE?

If you would like a chance at winning all four of our soon-to-be released July sets…
  • You can play in our It's Sketchy Challenge – there will be multiple winners there! Deadline for entries is FRIDAY JULY 12th at 5 PM EST. OR, play along with the gals for this week's Timeless Tuesday Challenge! Check out the links for the official rules!
  • All four of our July sets can be pre-ordered now, even before you see them all! Take advantage our New Release Bundle and get 10% off when you purchase all four together in a bundle.
  • All sets will be live first thing Friday morning along with the coordinating cut files for this release.
  • Come back to the Flourishes Blog Saturday for the Winner's Circle where we'll announce all of our winners of this weeks' challenges!
Join us back here tomorrow for a Summer set that's ready to PARTY!

~ Ally ~

Sponsored by:  Flourishes LLC

Supplies:
stamps: Flourishes (Anemones)
cardstock: Flourishes (Classic White, Black & African Daisy)
patterned papers:  Echo Park
die cut shapes:   Spellbinders
ink:  Memento, Copic
ribbon:  Flourishes
other:  thread.

Timeless Tuesday ~ Seeing Clearly with Dahlias!

Welcome to Day 1 of the Flourishes July Reveal Week!  Yeehaw!  Are you as excited as I am about seeing what Flourishes has to offer this month?!  We are simply giddy about introducing our first of FOUR new stamp sets this month.  Don't forget, you'll have many instances to WIN some of our new stamp sets for your very own! And this, our first new stamp set....

...are as though they are fresh clipped from the garden.  These breathtaking Dahlias would be a prize on any card or creation. Illustrated by Marcella Hawley, this 4 by 6" set features two gorgeous main images plus five all occasion sentiments, perfect for all kinds of creations.

AND...here's one way to win this gorgeous new stamp set for your collection...
You need to find out who today's Mystery Blogger is!  Hidden among the Design Team is one Designer who has this set to give away. Comment on that blog and you could win today's beautiful Dahlias stamp set!

Now...on to our challenge...
Deborah is our lovely hostess this week.  And her challenge this week is to...

...use ACETATE anywhere in your project or card (FTTC228).

That's right, it's time to dust off those clear pieces of "paper" and create something fun and unique!
I started off by creating a tri-fold card base using Flourishes Classic White Cardstock and our Clear Cover Cardstock for the two outer wings of the card.

Then I cut 3 of the Taylor-Made Classic Keyhole Die shapes, again using Classic White Cardstock and then I airbrushed them with some shades of pink Copics.

Then I stamped the gorgeous large dahlia image from the new Dahlias stamp set twice using Memento "Tuxedo Black" ink and began to colour them.  I coloured only the larger of the blooms on one image and fussy cut them out. I coloured all the greenery on the other stamped image plus I coloured the blooms with a base pink colour, just in case you can see under my fussy cut 3D blooms once assembled.


To colour my dahlias, I used the following Copic Collections:
R000, RV23/25/29, YG21/23/25/45, Y13.


Then I placed my layered dahlia blooms on the front of my card, adding some pretty Metallic Silver String and a fun Sparklet.
On the second, inner flap I chose to stamp the top of the dahlia bouquet from the new Dahlias stamp set using Memento "Rose Bud" ink and this wonderful sentiment...
 

And finally on the inside of my card, I stamped a birthday greeting.  The top of the greeting is from the Dahlias stamp set and I finished it off with the "Happy Birthday to you" from the Sentimental Favorites stamp collection...


Today we have both our Flourishes Finest Design Team AND our Friends of Flourishes Team sharing their "Seeing Clearly" inspirations with you!  Take a moment and leave some love on all of our designers' blogs for your chance to win this gorgeous new stamp set.
Have fun!  Thanks for stopping by today! Don't forget to leave a comment for your chance to win this beautiful new stamp set for your very own.

~ Ally ~

Sponsored by:  Flourishes LLC

Supplies:
stamps: Flourishes (Dahlias, Sentimental Favorites)
cardstock: Flourishes
patterned papers: Echo Park
die cut shapes: Spellbinders
ink: Memento, Copic
string: Flourishes
edge punch: Fiskars
gems: Flourishes

Timeless Tuesday ~ Going in Circles

Howdy everyone!  I certainly hope you have a had a great long weekend if you are from my neck of the woods here in Canada!  We celebrated another birthday for Canada.

Welcome to another fabulous Timeless Tuesday Challenge with Flourishes!  This week, the super talented Judy Rozema brings us our newest challenge...

Create a circle card this week (FTTC227).

Yup... it's a simple as that!

Here is my card for this week's circle card challenge...


First I created a scalloped circle card base in my digital cutting machine software and designed both a card base and a matching card front.  I cut my card front using the super cute papers from the June 123 Create Kit ~ Trial Mix.


Then I matted a piece of the pretty leaf print paper form the kit using some Flourishes Classic Kraft Cardstock and stitched around the edges.

Then I stamped the new gingham stamp from the "Berry Sweet Frames" stamp set using some fun Memento "Bamboo Leaves" ink onto Classic White Cardstock.  I coloured in the darker checks with some green Copics and fussy cut it out.


Next I die cut a piece Classic White Cardstock using the Perfectly Pierced Classic Frames Die set and trimmed it down to use as a tag to insert into my little gingham pocket.  I airbrushed it with a light brown Copic marker.

Next I stamped the "Congrats on your bundle of joy" from the "Inside & Out: Congrats" stamp set using Memento Rich Cocoa ink.  The dark green ribbon, twine and button are from the June 123 Create Kit ~ Trial Mix.  Such a cute kit!

I also added the "Hi Sweet Pea" from the "Garden Fresh" stamp collection.  It of course goes along with the sweet box of peas as my focal image.

To colour and airbrush my card, I used the following Copic Collections:
(E30, E31, E33, YG01, YG21, YG23, YG25, YG63, YG93)


Take a moment and leave some love on all of our designers’ blogs.
For further challenge details and where you can post your entry, please click here!

Thanks for stopping by today!

~ Ally ~

Sponsored by:  Flourishes LLC

Supplies:
stamps:  Flourishes (Inside & Out: Congrats, Sweet Berry Frames, Garden Fresh)
cardstock: Flourishes Classic White & Kraft
patterned papers, ribbon, button, twine, pearls: Flourishes 123 Create Kit ~ Trail Mix
die cut shapes:  Flourishes & Spellbinders
ink: Memento, Copic
tools:  Klic n'Kut
other: thread.
 
09 10