Timeless Tuesday ~ Paper Piecing & a CONTEST!


We have something extra special for this Timeless Tuesday Challenge. If you play along, not only will you get a chance to win our weekly prize drawing, you might get a chance to be one of our Flourishes' Guest Designers for December! HOORAY! And, there will not be just ONE winner. We will actually be choosing FOUR Guest Designers for December!!! Hip hip hooray!!!

The Friends of Flourishes and the Senior Design Team will be voting on their TOP THREE favorite projects once all the entries are in on Monday evening. The designers of those top three projects will be offered three of the four guest designer slots. Then, starting Tuesday October 8th, YOU will get a chance to vote for our PEOPLE'S CHOICE award by voting for your favorite creation! Stay tuned because next Tuesday, we'll share all the details of how you can cast your vote to help with our Guest Designer line up for December.  

Our 4 final Guest Designers will each receive...
  • a stamp set of their choice from the Flourishes Store;
  • a special 2013 Guest Designer badge for their blog;
  • featured status on the Flourishes Blog the week of their challenge;
  • and they get to lead and create the challenge that you and all of our fabulous designers use to create with for their assigned week!

THE GUEST DESIGNER CONTEST RULES

  1. You must follow all of the regular FTTC Challenge Rules as listed below.
  2. Only a MAXIMUM of ONE entry per person for the challenge this week, so make it is your best work! Please use at least your first name when titling your link so we know who you are.   Link up your creations HERE.
  3. Your project may not be combined with any other challenges for this week. It must be solely designed for our contest.
  4. Your project must contain some kind of stamping! We'd love to see your Flourishes stamps used but everything is welcome.
  5. No back linking to previous projects. This must be a completely new creation.
  6. You must have a personal blog to be considered for a Guest position.
  7. This contest is open to all countries.
Awesome right??

So... let's find out what our lovely hostess Broni has in store for our contest and challenge today...

FTTC240 Paper Piecing  

What's paper piecing you ask? 
Paper piecing involves cutting pieces out from a design and layering them on paper. This is a versatile technique. Stamps designs are often used for paper piecing projects. A design can be stamped several times on a piece of paper and then each area can be cut and adhered to a project. Don't get paper piecing confused with paper piercing!


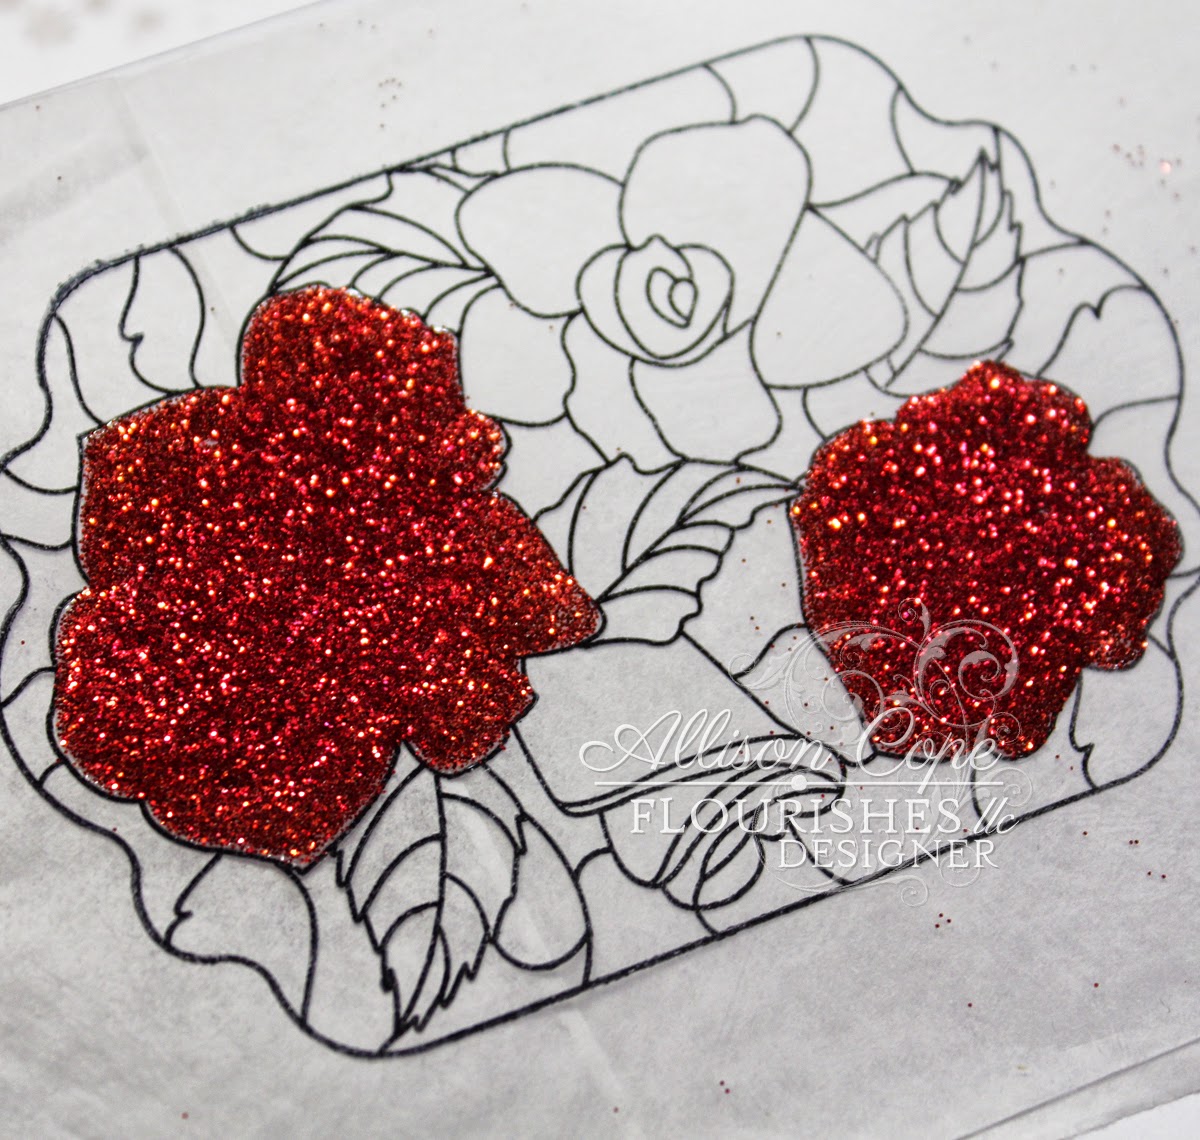
What a fabulous challenge!!  I love paper piecing so I went in search of stamp set that would work perfectly and finally decided upon the "Poinsettia & Pine" stamp set!

First I grabbed a variety of patterned papers that I liked from a variety of paper companies...

Then I stamped the large poinsettia image onto a variety of the papers.  Then I began the process of cutting out individual pieces to adhere to my stamped image on my Flourishes Classic Ivory card base.  Here's a peek at one of my first additions to my card...

I wasn't worried completely about cutting around all of the image details.  I like the fact that I add layers of paper to my image to give it more of a 3D in effect.  As long as the image above it is going to be covered by more paper, I left it there.

Here's a close up of my paper piecing project about 2 thirds of the way through the process...
 
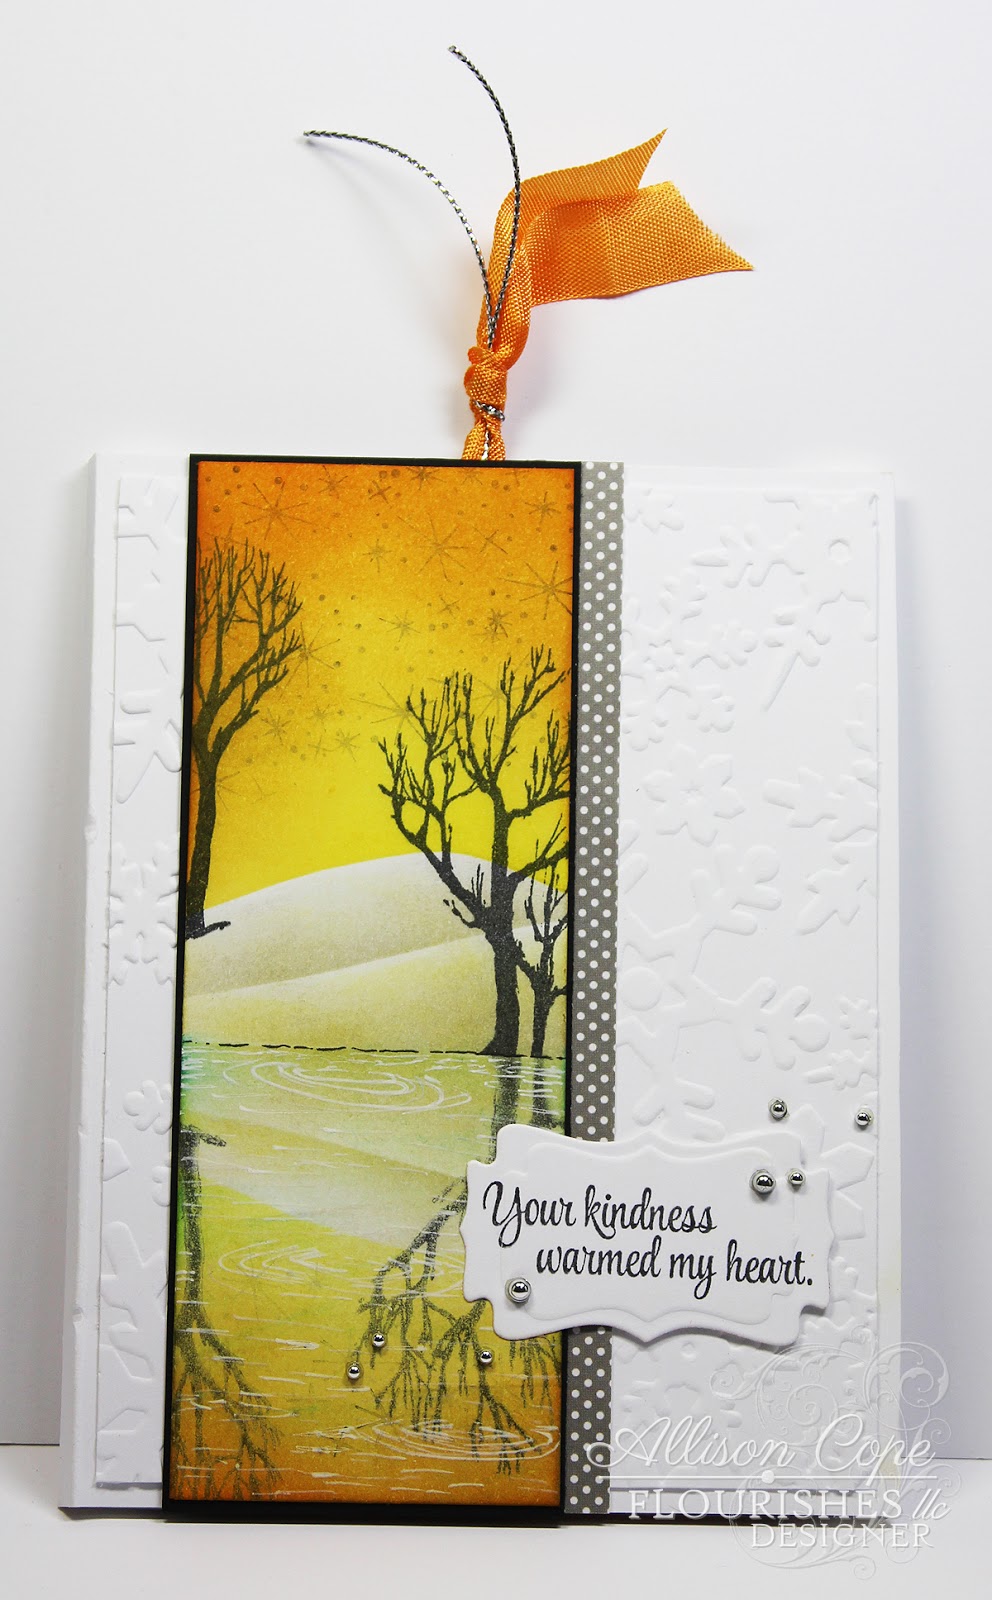
And here is my final card creation using the paper piecing technique...
For the finishing touches of my card today, I used some Gold Metallic String, some "Moss Green" Seam Binding Ribbon from the Color Made Easy "Pistachio" collection and I added some subtle dots to the back ground of my image using the following Copic Collections:

Here's one final close up of my paper piecing.  I added some fun glitter to my berries and flower center...


Thanks for stopping by today!  Make sure you give this fabulous challenge a chance this week!  REMEMBER... by participating this week you could be chosen as one of our FOUR December Guest Designers!  Good luck!!

Now, take a moment a leave a comment on our talented Friends of Flourishes Team member blogs and our guest designer for the month...
Happy blog hopping!

~ Ally ~

Sponsored by Flourishes LLC

Supplies:
stamps: Flourishes (Poinsettia and Pine)
cardstock:  Flourishes Classic Ivory Cardstock
patterned papers: Basic Grey, My Mind's Eye, Simple Stories
ink: Memento, Copic
string, ribbon:  Flourishes 
gold pen:  Sakura
glitter: Martha Stewart
other: bells.

The Winner of "Snow Scenes" is...


And the random winner of my "Snow Scenes" stamp giveaway is...

Commenter #5....


Congrats Kathy!  I'll email you for further mailing details!  Thanks to those who stopped and left a comment on my Timeless Tuesday Challenge this week!  Don't forget... you have until 6pm Monday to play along with my challenge this week.


~ Ally ~


Sunday Sharing with Flourishes

I just thought I'd share a few of my recent Flourishes creations with you today...

Inspired by an antique clock on a shopping site for a challenge at Splitcoaststampers.  I used the "Moments in Time" stamp set from Flourishes.  Every single piece of paper is stamped - no patterned paper here!

Created for a colour challenge for Splitcoast using green, grey and white and the chalkboard technique.  I used the new "Holiday Topiaries" stamp set for this card.
Another card created for a Splitcoast challenge.  Inspired by a decorative throw pillow.  I used the gorgeous "Fanciful Flourishes" stamp set.

Hope these creations inspire you to pull out some paper and ink and have a great time creating like I did this week!

~ Ally ~

Glitter and Roses!


Friday has rolled around again and the Flourishes Design Team has a treat for you today! We're digging into the Flourishes vault to showcase some of our sets that are retiring! As we make room for new, it means we need to clear out some of these beauties. So - if you like what you see along the way - be sure to add them to your shopping cart, because once they're gone - they're gone for good!

It always feels a little sad to say goodbye to some beautiful sets we've loved so well - so I know the Design Team will show them off wonderfully and you'll be inspired!

Drop by and see:


Howdy all!  TGIF!!!  My son has today off of school but my husband goes back to work this morning so it will just be my little guy and me for the next 10 days.  Fun, fun, fun!

I've been itching to do something with glitter... I mean, who can resist glitter right?  So I grabbed some glitter and some other simple supplies and made myself a glitter window card!


For my card today I used my favourite cardstock, Flourishes Classic White cardstock and I added some simple embossed lines using my Scor-Buddy

To begin making my focal image, I stamped my beautiful roses window from the Beauty Within stamp set using StazOn ink onto some Clear Cover Cardstock


I flipped my inked side of the clear cover cardstock to the back and then I took my Glossy Accents and filled in only the roses.  I was careful to stay within my lines.


Next I sprinkled on my fine glitter.  For my roses, I used 2 tones of red glitter, one more orangey then the other.  (Sorry... It's very hard to see the difference in the photo.)  I made sure to brush off any stray glitter particles before going on to the next area.


Then I went on to add Glossy Accents to the pink roses, then the green leaves and then finally to the background.  Each time I used 2 tones of colour for added depth.


I sure hope enjoyed my simple and EASY tutorial on ho to make a glittered image.  Try on your next card... maybe for Halloween!

Christine Okken is next on the list today.  Make a stop and visit her blog for more retiring stamp set inspiration!

~ Ally ~

Sponsored by Flourishes LLC

Supplies:
stamps:  Flourishes (Beauty Within)
cardstock:  Flourishes Classic White
die cut shapes: Spellbinders
glitter: Martha Stewart
glitter ribbon: Micheals 
tools:  Scor-Pal
ink:  StazOn
pearls:  Recollections.

Peace & Joy: Silhouette Cameo Happiness!

I couldn't resist creating some fun holiday cards to share with you today.  I was pondering how I wanted to best show how versatile the beautiful "Peace and Joy" stamp set is so I pulled up my Peace & Joy Silhouette Cut File and began to design a simple panel for a cute card front. I designed the panel to capture part of each word from the beautiful stamp set; hanging part of the image in the air.

Here is the first card panel I designed using the word and stamp "JOY".  See how the word hangs over the top of the panel?  The dark green is all one piece of paper and makes for a really simple and cute card front.
I wrapped my card panel using some pretty "Moss Green" Seam Binding Ribbon from the "Pistachio" Color Made Easy collection. My A2 card base is made from "Sea Salt" cardstock from the "Emerald Coast" Color Made Easy cardstock collection.  It matched perfectly to the greeny-blue in the striped patterned paper I used.

For my second I card I started with a card base made from "Patch" cardstock from the "Pistachio" Color Made Easy cardstock collection.  Once again, I designed a panel to fit the stamped word "PEACE" from the beautiful "Peace and Joy" stamp set so I pulled up my Peace & Joy Silhouette Cut File again and designed a longer panel to fit my stamp.
Once again, I wrapped my card panel using some pretty "Moss Green" Seam Binding Ribbon from the "Pistachio" Color Made Easy collection and added a few mini pearls to finish off my card.

I used a YG17 Copic Marker from the Green Grass Copic Collection to add a little bit of darker green to the stamped and embossed holly embellishments for both cards.

Thanks for joining me today!  I hope my cards inspire you to pull out your stamps and cut files and have a go at creating something fun.

Ally.

Sponsored by Flourishes LLC

Supplies:
stamps:  Flourishes (Peace and Joy)
cardstock:  Flourishes Classic White, "Pistachio" & "Emerald Coast" collections
patterned papers: Simple Stories (December Documenter)
die cut shapes: Flourishes Silhouette Cut Files
ink:  Versamark, Copic
embossing powder:  Stampendous!
ribbon: Flourishes
tools:  Silhouette Cameo
pearls:  Recollections, Doodlebug
other: thread.

Stripes and Polka Dots

I had fun playing with all kinds of fun patterned papers today from Bo Bunny!
For my card I used one of the newest releases from Flourishes, "That's a Wrap!" stamp set.  It has the cutest little bow, sentiment and tag element to it! 

I used this week's sketch #312 from Mojo Monday as my design inspiration.  I decided to rotate it 90 degrees first.

I also combined my card today with my newest find, The Pink Elephant challenge:  to use polka dots and stripes on your project this week!

Hope you're all having a great week!  Don't forget to check out my GIVEAWAY too!

~ Ally ~

Sponsored by Flourishes LLC

Supplies:
stamps: Flourishes (That's a Wrap!)
cardstock:  Bazzill, Flourishes
patterned papers: Bo Bunny
ink:  Memento, Copic
gold pen: Sakura
other: thread.

Timeless Tuesday ~ Build it with DOTS!

Timeless-Tuesday-New-Logo 
Happy Tuesday everyone and welcome to another fabulous edition of the Flourishes Timeless Tuesday Challenge!! I get to be your hostess this week and I'm hoping to challenge you to create something with SUPER FUN this week.  My challenge to you is to...

Create a card or project using DOTS to color your back ground and/or part of your image.
This technique is known as POINTILLISM.
(FTTC239)

Notice the pears on my card below. They are coloured using just dots! Yup!! Some dots are large, and some are quite small but the pears are coloured using only layers of simple dots.


I used the following Copic Collections to colour my focal image above:


My card this week is actually an easel card so I decorated the inside of my card to match the front! 


Now on to my tutorial...  Click any image to enlarge it!


Pointillism Tutorial using Copic Markers

Step 1:
I first stamped my pears on Flourishes Classic White Cardstock using Memento "Black Tuxedo" ink and then I coloured the whole fruit using the Copic YG0000.  I let it thoroughly dry and then I applied some large dots of the same colour.


Step 2:
Then I grabbed my Y000 and added more large dots over top of the previous dots.  The colour is slowly beginning to develop and shade the pear.

Step 3:
Then I began adding some G20 to build in the green colour of the pear.  This time I used a medium sized dot and applied it right over top of my two yellow shades leaving some "light" spots on the pear's surface.


Step 4: 
Then I grabbed a brighter yellow-green Copic, YG21.  I applied a medium and small dot to all the areas again to once again, build that colour up!

Step 5:
Then I went brighter still and added some YG01.  I added an array of medium and small dots to the pear leaving the "light" spot open and free of dots again!

Step 6:
Then I added some soft pink because if you have ever looked as some pears, they have almost a pinky-peachy hue to parts of them!  Here I used some soft R000 small dots of colour.

Step 7:
Then I started building it a touch of soft orange.  Here I used a YR20 and simple small dots.

Step 8:
Here I added some more bright yellow to make the surface pop with colour.  I used Y04.

Step 9:
For the last and final step, I added some G40 to add that last touch of green colour to my pears.  See where the shadows are?  I added more concentration of dots to these areas to saturate the colour I was using and to create those shadows in the fruit.

I hope you try this easy and fun technique this week. We can't wait to see what you create for this week's challenge! Take a moment a leave a comment on our talented Friends of Flourishes Team member blogs and our guest designer for September...
AND... 
Since I'm hostess for this week's challenge, I'm going to GIVEAWAY to one of my lucky commenters here on my blog, one of our fabulous NEW FLOURISHES STAMP SETS!  
One lucky commenter will win our new September release "Snow Scenes" stamp set from me!  All you have to do to be eligible, is leave a comment below.  I will announce a winner here on Sunday sometime so you have until then to leave a comment.  Good luck!

COMMENTS ARE NOW CLOSED.

Good luck everyone! Happy stamping everyone!

~ Ally ~

Sponsored by Flourishes LLC

Supplies:
stamps: Flourishes (Pears)
cardstock:  Flourishes Classic White, "Poppy Red" Collection, Bazzill
patterned papers:  Bo Bunny
die cut shapes: Spellbinders
ink:  Copic, Memento
pen:  Copic Multi-liner 3.0
edge punch: EK Success
tools:  Copic Airbrush
pearls:  Recollections
other: thread.

Warm Winter Wishes Everyone!

I know!  I know... it's only the first week of Fall... what am I doing making Christmas cards?  Well I tell ya, it's my favourite kind of card to make.  There is always some sparkly to add or a cute image to colour.  It's my favourite time of the year by far.

Today I'm sharing a card featuring the "Warm Winter Wishes" stamp by Flourishes

I stamped my cute little snowman onto Flourishes Classic White Cardstock first.  This cardstock is by far the BEST cardstock for colouring with Copics.  It takes the Copic ink so well, doesn't pill and allows you to blend several times if needed.  I hoard this stuff!! :)

All of the patterned papers I used for my card are from the new BasicGrey "25th and Pine" collection.  I just love the red and greens paired with navy and beige!

I even used some Spellbinder Classic Oval dies paired with "Create-a-Flake Five" and "2013 Snowflake Pendant" dies.

Here's a quick peek at the inside of my huge 6x6 card...

All of the snowflakes and the sentiment are from the "Warm Winter Wishes" stamp set too!

For my card design, I used sketch #224 from Sweet Sketch Wednesday for this card:


And I also combined it with the newest Merry Monday Challenge #76; to use a snowman on your card!


Thanks for stopping by.  Make sure to check out my Timeless Tuesday Challenge post this week!  I'm doing a little stamp GIVEAWAY!  Check back tomorrow for details!

~ Ally ~

Sponsored by Flourishes LLC

Supplies:
stamps:  Flourishes
cardstock:  Flourishes, Bazzill, Coredinations
patterned papers: BasicGrey
die cut shapes: Spellbinders
ink: Memento, Copic, Stampin' Up!
ribbon:  unknown
tools:  Grand Calibur
pearls:  Doodlebug
other: thread, Stickles.

Warm Winter Glow

Free for All Friday with Border 
Today we're excited to bring you one more look at this month's New Release Sets at Flourishes! Its our chance to show off some more from our favorite sets, and with five gorgeous stamps this month, there's so much to choose from! Remember that today is the LAST day you can purchase the New Release Bundle at a discount, so we don't want you to miss out on the deal! Come and see what beauties the Design Team has to show off for you today!
Image 2
Today I'm sharing a slider card... 'cause I can't resist a card that interacts!  My favourite kind of card by far.

I began creating my card by first cutting out my card base from Flourishes Classic White cardstock (approx. 4 1/4" x 5 1/2" ~ with a spine of 1/4" thickness).  I added a quick embossed panel using the same cardstock.

Then I cut a 2 x 5 1/2 piece of Classic White cardstock and began stamping my scene.  First I inked up my double tree image from the Snow Scenes stamp set using Memento "Tuxedo Black" ink and carefully stamped it on to my mirror image stamp (it's basically a stamp block with a flat piece of rubber on it) and then I stamped that surface onto my small strip of cardstock to create the reflected tree.  I discovered that it's easier to stamp the "reversed" image first then you can line up your fully stamped image more easily.  I repeated this step with the single tree image.
Then I inked up both trees again and stamped them above their reverse images to create the trees on the land.  I created the waterline using the Copic Multi Liner 0.3.  Then I masked my skyline using Post-It Notes and inked it up using Ranger Distress Inks (Mustard Seed, Wild Honey & Spiced Marmalade). Then I masked off the hills and inked them up too (using Mustard Seed and Pumice Stone).  I stamped a few clusters of the stars from the Snow Scenes stamp set using Memento "Tuxedo Black" ink that I stamped off once to achieve a more subtle colour.  I added a few water lines using a white gel pen.

I used the same masking and inking techniques to complete the inside panels of my card. I tied a Mango Orange Seam Binging along with a piece Silver Metallic String to pull out my inserts.


And here's a closeup of my lower pullout!  All of my matting is using Flourishes Classic Black Cardstock.

I hope you've enjoyed my card inspiration today.  Try this reflection technique with this gorgeous new stamp set yourself.

~ Ally ~

Sponsored by Flourishes LLC

Supplies:
stamps: Flourishes (Snow Scenes)
cardstock:  Flourishes (Classic White & Black)
die cut shapes: Spellbinders
patterned paper:  Simple Stories
ink: Memento, Ranger Distress
embossing folder: Sizzix
ribbon, string: Flourishes
gems:  Hero Arts

Music, Roses and Christmas

Howdy all!I have another fabulous card made using one of the newest Flourishes September releases... That's a Wrap!

I chose to combine three challenges for my card today.

The first one is to use the Merry Monday Challenge #75;
use red, dark brown, vanilla and champagne/gold with some shimmer!

You can notice the gold a little more in my close up...

I also combined my card with the Christmas Card Challenge #42 to use "music" and the There Shes Goes Challenge #225 to make a card or project that is either a present, or has a present on it!

This card was so easy to make too!  Minimal colouring and I just love the touch of gold!  It adds just that "little something" to make it a fabulous holiday card.  Thanks for stopping by today!

EDITED TO ADD:

I received an Honourable Mention for this card for the Merry Monday's Challenge!  Thanks to Lesley and her team for a fabulous challenge!  I'll be playing again for sure!

~ Ally ~

Supplies:
stamps: Flourishes (That's a Wrap!)
cardstock:  Bazzill, Flourishes Classic White
patterned papers: My Mind's Eye (Mistletoe Magic)
ink:  Ranger, Memento, Copic
gold pen:  Sakura
other:  Stickles.

 
09 10