Jingle All the Way & a Black Friday SALE!

Hello all! We hope you had a wonderful Thanksgiving with family or friends! At Flourishes, we feel stuffed — not only our bellies but our warehouse as well! We are ready for the Christmas season and to get YOU ready, we have one heck of a Black Friday Sale that kicks off NOW!

  BlackFridaySale13 

What's on sale? EVERYTHING that is on our SALE PAGE-- you can take an ADDITIONAL 30% OFF! We need to move some inventory and our loss is YOUR gain! We should point out there are TONS of items on our sale page -- more than 300 items to be exact!!! All you have to do is put in the coupon code: BF30SALE in the coupon code box at the time of check out. If you have your eye on something that isn't on the sale page -- stay tuned! We'll have a second CYBER MONDAY SALE kicking off Monday and in that sale -- all items store wide will be 15% off. Shop now for big savings or wait and shave some savings off your total!

Now for a little shopping incentive...

Today I'm sharing a layered Christmas card using some cool retiring stamp sets!
 My focal image is a stamp from the "Petals & Peace" collection.  It's stamped with Memento "Black Tuxedo" ink onto Classic White Cardstock.  I fussy cut it out and then matted it using some "Red Devil" cardstock from the Poppy Cardstock Collection using the Flourishes "Tailor-Made Classic Keyhole Die".

I coloured my image using the following Copic Collections:

Here is a close showing the sentiment, also from the "Petals & Peace" collection, stamped on a piece of die cut vellum.  A added a pretty double bow using some white Seam Binding Ribbon.

Behind my ornate die cut, I have two panels of patterned paper from the Echo Park "Reflections" patterned paper pad.  Yup... I used some non-holiday papers but then I stamped some holiday themed stamps right over top of them!   For the green paper I stamped the "Holly Background" and for the yellow, I stamped the "Christmas Music" back ground using Memento "Olive Grove" ink.   I thought both backgrounds fit nicely with the focal image's background!

Thanks for stopping by!

Now to inspire you with some fantastic creations with our retiring sets (which are on sale right now!) and some fun Christmas items…cue the Design Team!
Happy shopping!

~ Ally ~

Sponsored by Flourishes LLC

Supplies:
stamps:  Flourishes  (Petals & Peace, Christmas Music, Holly Background)
cardstock:  Flourishes  (Classic White, Poppy Collection)
patterned papers: Echo Park (Reflections)
die cut shapes: Flourishes, Spellbinders, Cheerylyn Designs
ink:  Memento, Ranger, Copic, Versamark
ribbon: Flourishes
tools:  Silhouette
gems:  Prima
other:  thread, vellum, white embossing powder.

12 Weeks of Holiday Cards ~ Week 9

Welcome to Week 9 of my 12 Weeks of Holiday CardsOnly 3 week left!

Each Wednesday until Christmas, I will be sharing with you a fun and simple holiday card fit for a quick assembly.  I will share tips, tricks and techniques along the way.  So join me...

Use Simple Die Cut Shapes!

For this week I'm challenging you to use make your life easier and use simple die cut shapes like circles, rectangles and square shapes on your holiday cards.

For my card examples this week, I chose to stamp my Santa image onto a simple circle die cut and then mat it with a simple scalloped die cut circle too.  You could use a circle cutting tool, a brass die cut or electronic die cutting machine to make you simple shapes... especially if you are making lots of the same holiday card.  It's so much easier than cutting these shapes out by hand too!

You can do the same thing with simple shapes like tags or labels too!  For my cards today, I used a Silhouette tag shape and then stamped a unique greeting on to each card front instead of having them 100% identical.


I also used a fun pine bough punch for the greenery on my cards too.  A punch always make quick work for making simple and repeatable elements on your cards.

If you are interested in my previous tips for holiday card making, check out my previous posts:

For my cards design today, I used the newest sketch from Splitcoaststampers... SC464...


With only 4 weeks until Christmas today, we are slowly winding down to this beautiful season of family and thankfulness.  Wow... this year has gone by so fast!

Next week I will be giving away a little holiday inspired GIVEAWAY!  Stay tuned on how you could win my holiday stamp package!

~ Ally ~

Timeless Tuesday ~ Score, Pierce & Colour!

Happy Tuesday everyone!  Welcome to the newest Timeless Tuesday Challenge at Flourishes!  Today is extra special here in my household. My Mom is flying in today to spend a week here.  Since she lives so far away, it's wonderful that she takes the time to come and spend time at our house.  I always make time to go home too but it's nice to have her come here so my son's schedule doesn't get too disrupted.  We're looking forward to some mother - daughter time, maybe some Christmas shopping and having lots of yummy coffee dates!  So I'm off to have lots of fun this week!  Ta ta!

This week our lovely hostess is Connie and Connie's challenge is to...

For my card today, not only was I inspired by the use of scoring, piercing and colouring, I was inspired by the Splitcoaststamper's "Inspiration Challenge" - to use a beautiful fountain pen image as card inspiration from the hostess' Pinterest board found here.  This is the image I chose from all of her beautiful and inspirational images...

Source
I loved the gorgeous gold and red combination and knew it would be perfect for the birthday card I needed for my sister-in-law.  Today is her actual birthday so I know it'll be a little late but I know she'll appreciate it!  Happy birthday Heidi!

I began creating my card by cutting a panel of deep red cardstock and brushing it with my Perfect Printing Pouch (an anti-static powder pouch).  Then I inked up my large floral image from the "Bees & Blooms" stamp set using Versamark ink. Then I sprinkled on my detail gold embossing powder and heat set it.  Then I took my panel and created a scored frame 1/8th of an inch around the edge of the panel using my Scor-Buddy and then I pierced just inside my raised score line.  I wrapped two adjacent corners of the Classic Black Cardstock matted panel with "Chocolate Brown" seam binding ribbon (I didn't have any more black :( )...
Next I cut a Perfectly Pierced Victorian Oval from Classic White Cardstock  and stamped a large rose image from the retired "I Love Roses" stamp set in Versamark ink again.  I added some detail black embossing powder and heat set the image.

Here's a close up my roses and gold back ground...

I coloured my rose in using the following Copic Collection:
For the inside of my birthday card, I stamped the "Happy Everything!" greeting from the 2013 FLIP stamp set, "Happy Thoughts" and the "Happy Birthday" greeting from the "Kids Play" stamp set using Memento "Black Tuxedo" ink.  And of course, I added another rose image too.


So I indeed, used some SCORING, some PIERCING and some COLOURING in my card this week.  I actually love how this card turned out.  I sure hope my sister-in-law does too!  Thanks for stopping by!

Be sure to visit the rest of the DT’s blogs, as well as our November Guest Designer and leave them a little blog love. In return, they will amaze you with their talented works of art…
Happy hopping!

~ Ally ~

Sponsored by Flourishes LLC

Supplies:
stamps:  Flourishes (I Love Roses ~ retired, Kids Play, 2013 FLIP Happy Thoughts, Bees & Blooms)
cardstock:  Flourishes Classic Black & White, Bazzill
patterned papers:  My Mind's Eye (All is Bright)
die cut shapes:  Flourishes Victorian Ovals
ink:  Versamark, Memento, Ranger
cardboard cardstock: g
gold pen:  Sakura
tools:  Scor-Buddy, Tim Holtz piercing ruler


12 Weeks of Holiday Cards - Week 8 - Sorry... it's REALLY Late!

Welcome to Week 8 of my 12 Weeks of Holiday Cards!

Each Wednesday (apparently not last week!  LOL!) until Christmas, I will be sharing with you a fun and simple holiday card fit for a quick assembly.  I will share tips, tricks and techniques along the way.  So join me...

Make 2 for 1!

Today I'm sharing an EASY and fun card making tutorial on the Scrapbook & Cards Today blog!

I'm sharing a tutorial on how to maximize the use of your scrapbook supplies and make beautiful holiday cards too!  Check out how I made these snowy creations by click the link HERE!


Happy stamping everyone!

~ Ally ~

Free For All Friday ~ November Release Focus!

Today we bring you another round of inspiration created with our brand new November Release Stamp sets from the Senior Design Team. We had so much fun with them we just couldn’t stop making cards! It’s our chance to show them off at least one more time while you can still purchase the November Stamp Bundle at a discount! Today is the last day the discount is available and we don’t want you to miss out!

Howdy all!  In honour of all the chilly weather we're having around here in Alberta, I decided to go for that "winter sweater feel" for today's creation...
My card base is made from "Smoky" cardstock from the Cool Neutrals Color Made Easy collection.  Then I stitched some cool patterned papers together and matted them using "Thunder" cardstock from the same cardstock collection.

I stamped my coffee cup from the new "Grab a Cup" stamp set onto some diamond patterned paper and also some Classic White Cardstock amd fussy cut out all the coffee cup pieces.  I coloured in my lid and coffee wrap using the following Copic Collections:
 
On the wrap part of my cup image, I used some Memento "London Fog" ink and stamped some of the damask diamonds from the "So Distressed" stamp set.  I also stamped some chevrons using the same ink in the corner of the blue and white polka dot paper...

I finished off my card with a simple double bow using some beautiful "Delft Blue" seam binding ribbon and metal die snowflake charm.

For the inside of my card, I used a subtly coloured patterned paper and stamped my sentiment from the "Grab a Cup" stamp set in Memento "Tuxedo Black" ink and then some more chevrons from the "So Distressed" stamp set using Memento "London Fog" ink again.


For my card front design today, I used the latest sketch from the Mojo Monday blog, #320:

Thanks for stopping by everyone!  For everyone who has begun to experience those cold winter days, stay warm!

So hop on over to see what cozy and warm creations everyone has in store for you today:
Happy hopping!

~ Ally ~

Sponsored by Flourishes LLC

Supplies:
stamps:  Flourishes (So Distressed, Grab a Cup)
cardstock:  Flourishes Classic White, Cool Neutrals Collection
patterned papers: Echo Park (Keepin' Cozy)
ink:  Memento, Copic
adhesive sparkle ribbon: Recollections
ribbon:  Flourishes
metal embelly:  Momenta
pearls:  Recollections
other: thread.

Happy, Happy Birthday Princess Julie!


Today is a special day for the Flourishes Family to celebrate our Birthday Girl - Julie Koerber!  And Julie is definitely worth celebrating!  She’s the right hand on so many levels of what’s beautiful about Flourishes, and we’re so grateful for her and blessed to also call this lovely lady friend.  

This summer a number of the Flourishes Senior Design Team girls gathered for a weekend in Yellowstone National Park.  It was a fantastic time of fun!  One of the great things some of the girls did was go Whitewater Rafting.  Because there were family members along, Julie graciously said she’d sit in the middle of the raft so the kids could get the most out of the experience.  The raft guide however thought that would be a fun opportunity to tease Julie about her “Princess" status.  She gracefully took it and we love to tease her about it - and so the idea for this Princess Birthday Hop was born!  Julie we love you and your fun, spunky spirit, and also the warmth and grace you live your life with!  Happy Birthday from all of us at Flourishes!  You can see some fun pictures of the DT's adventure on the Flourishes Blog here.

Happy Birthday Dearest Julie!
I hope you have an amazing day spent with family and friends today!  Thanks for all the wonderful things you do for our Flourishes Family... we wouldn't be a family without you!  Best birthday wishes and hugs from afar!
Ally.

Today I'm sharing my Princess inspired card creation in honour of our birthday girl, Princess Julie!

I started my card by using some "Tangy Taffy" cardstock from the Candy Pink cardstock collection for my card base.  Then I die cut an ornate piece of "Sweet Tart" cardstock from the same cardstock collection and stamped some long stars from our fabulous and princess-y "Make a Wish" stamp set using Memento "Rose Bud" ink.   Then I cut a strip of Classic White Cardstock and stamped some starry swirls and long star images using both "Rose Bud" and "Lilac Posies" Memento ink.  I stamped my sentiment first in "Tuxedo Black" ink and then slightly to the right with "Pear Tart" ink.

I stamped my crown and pillow image from the "Make a Wish" stamp set onto  Classic White Cardstock and coloured my image using the following Copic Collections:


I used my Copic Blender Pen to "dot" my pillow fabric.  And I added some fine silver pen, gloss pen and some cool purple gems to my crown to make it shine!  My pretty bow is made using "Lavender" Seam Binding Ribbon.


For my card design today, I used today's newest Card Sketch from Splitcoaststampers... designed by yours truly!

Happy Birthday Julie!!!


We invite you to hop along today with many of our Flourishes Family to see our pretty Princess and Birthday inspirations, and join in on our wishes for Julie!

Comment along the way and you could be entered to win any Birthday set of your choice from the Flourishes Store!  Winners will be chosen and announced on Saturday November 23rd on the Flourishes Blog.

And don’t forgot to drop by Julie’s place to send her your Happy Birthday wishes too!

Allison Cope -- you are here!
Christine Okken
Cindy Lawrence
Heather Jensen
Silke Ledlow
Stacy Morgan
Tosha Leyendekker
Cheryl Lea
Deborah Anton
Jenny Gropp
Judy Rozema
Katie Sims
Aleksandra Mihelič
Kathy Jones
Meredith MacRitchie
Naomi Gong

Happy hopping everyone!

~ Ally ~

Sponsored by Flourishes LLC

Supplies:
stamps:  Flourishes (Make a Wish)
cardstock:  Flourishes (Classic White, Candy Pink Collection)
patterned papers:  Echo Park (Here & Now)
die cut shapes: Spellbinders
ink:  Memento
ribbon: Flourishes
pens:  Glaze & Glitter Pens by Sakura
gems:  Doodlebug.

Timeless Tuesday ~ Winter Scene


Howdy stamp fans!  It's Tuesday... time for another fabulous Timeless Tuesday Challenge with Flourishes today.  If you checked out the blog yesterday, you know that I've been under the weather for a few days and today was going well until about an hour ago.  My poor tummy is just not right so I'm going to quickly get this post written and off to bed I go again.  Being sick sucks!!!

This week, the lovely Deborah is our host! And she is challenging us to...

What a fabulous challenge with so many cool possibilities!  In our household, winter brings snowboarding and skiing season.  And believe it or not, our ski hill is already open and has been for 2 weeks already.  We love to ski at Lake Louise and my son is already talking about going boarding and having lots of fun on the slopes!  So that's what I used a "winter scene" inspiration for my card today...

I started off by die cutting a piece of Classic White Cardstock using the Perfectly Pierced Victorian Oval die and then stamping my ski image from the "Snow Day" stamp collection using Memento "Espresso Truffle" ink.  I stamped the same image again on a scrap piece of white cardstock again and coloured it using the following Copic Collections and my Copic airbrush for the back ground:
I created my card base and matting all using the Flourishes "Emerald Coast" cardstock collection.  I used all 3 colours of the collection in my card today!  For the design of my card, I used the Upright Diamond Fold Card tutorial from Splitcoast.  It was fun to make a card that pops when you open it!

I knew I needed to repeat my golden rod colour some how in my design, so I created a diamond panel for my focal points back drop.  First I cut a piece of Classic White Cardstockin the diamond shape and I stamped the cute little "sweater pattern" also from the "Snow Day" stamp collection using a yellowy colour of ink.  I pierced the edges to match my pierced die...


For the inside of my card, I kept it really simple.  I stamped the "Snowy Greetings" from the "Snow Day" stamp collection in the corner using Memento "Espresso Truffle" ink.  And to keep my diamond card closed, I added a simple clip with a pretty bow made from "Primrose" seam binding ribbon from the Sunflower Collection.

Thanks for joining me today!  As I said, I'm off to bed again.  I think I'll take my heating pad with me again tonight!  Happy blog hopping everyone!

Before you any farther, be sure to visit the rest of the DT's blogs, as well as our November Guest Designer and leave them all a little blog love. In return, they will amaze you with their talent and creativity...
Thanks for stopping by!
~ Ally ~

Sponsored by Flourishes LLC

Supplies:
stamps: Flourishes (Snow Day)

cardstock:  Flourishes Classic White, "Emerald Coast" Collection
patterned papers: Bo Bunny (Elf Magic)
die cut shapes: Flourishes (Victorian Ovals), Spellbinders (2013 Snowflake Pendant)
ink:  Memento, Copics, Ranger, Stampin' Up!
tools: Copic Airbrush, Ranger Piercing Ruler
ribbon:  Flourishes
clip:  Tim Holt.z

And Finally, Introducing... So Distressed!

Here we are at our last day of November Sneak Peek Sets! Do you sometimes look at your blank sheet of card stock and think, “I wish there was a way I could warm it up or add some interest or texture without taking anything away from the main image?" Or have you been longing to get your fingers inky and dabble in the mixed media craze? Well, we’re ready for you! Introducing...

SoDistressedGraphic
With Mixed Media all the rage, why not add a background set to your bag of creative tricks? This pattern and background set offers all kinds of images that can be used on their own, or as a way to add "texture" to your cards or creations. The options are endless! How about trying to layer these images for even more fun? This set measures 4" by 6". Our team loved getting inky with this clever set, so hop on over for some creative inspiration.

When I first saw this stamp set, I actually jumped for join!  Being a scrapbooker and a card maker, I enjoy tinkering with all kinds of mixed media projects and I knew the "So Distressed" stamp set would become one of my all-time-favs and I knew I'd be using it A LOT!  Since I love to experiment with these kinds of images, I actually have two cards to share with you today.

For my first card, I started with a card base of "Thunder" cardstock from the Cool Neutrals Cardstock collection.  Then I created a simple mat using Classic Kraft Cardstock.  Then I cut 2 pieces of patterned paper and applied some of the stamp textures to the edges of my papers...

For my embellishments, I twisted some 'Smoke Grey' Seam Binding (yum... my new favourite "black"!) and some Silver Metallic String and I accompanied it with a beautiful Emerald Coast button and fun star pin.

The minute I saw the chevron stamp, I immediately thought of that traditional strip on the "air mail" envelops and so I created a faux mini envelop as part of Christmas card design.

Below is a close up of my card.  Inside this shot, I used four of the many texture stamps from this set... the "coffee stain", the "ink drops", the "graphic mini dot", the double row "distressed dots" and the "chevron".  I used Memento "London Fog" ink and Ranger's "Vintage Photo" ink for all my stamping.


And of course, I had to finish off the inside.  I used almost all of the stamps from the "So Distressed" set for this one; including the "Snow Day" set to add my skates to the corner and the "Christmas Candles" stamp set for the Merry Christmas greeting.

Here is my second creation.  I decided to go even more "mixed media" for this one!


To start my card, I used some Classic Black cardstock for my card base and then some matting using "Desert Marigold" cardstock (from the Sunflower Cardstock Collection) and "Festive" (from the Tiger Lily Cardstock Collection).
I started off my focal piece by embossing a piece of Classic White Cardstock.  Then I inked up the "graphic mini dot" with some Memento "Tuxedo Black" Ink and very carefully applied it to the raised surface of the embossed paper.  Then I used a ink blending tool and rubbed in some Ranger Distress Inks: Mustard Seed, Wild Honey and Spiced Marmalade.

Then I applied a layer of watered-down layer of white acrylic paint and added a few more areas of fresh "graphic mini dot" stamps in black ink again.  Here's a close up... you can see all the teeny, tiny little dots on the raised parts of the paper...


 I even took the time to add some "distressing" to my Tailor-Made Classic Tag with the images from one of our other November release stamp sets, "Grab a Cup".  I attached it with a loop of Black Jute.

 I hope I've inspired you to create today!  I know you are going to LOVE this new stamp set!

And, while you’re hopping remember, we have one more day of….
Mystery-Blogger-Graphic
Hidden among the Design Team’s blogs today is our Mystery Blogger of the day. Comment on her blog and you could be chosen to win today’s set! The more you comment, the better your chances of winning.

Do you want to win Flourishes’ November Release?

  • If you would like a chance at winning all newly released November sets…you can play in our Grab A Cup Challenge – we will have multiple winners there! Deadline for entries is TODAY November 15th at 5 PM EST. Check out the link for the official rules!
  • All three of our November sets are available now HERE! Take advantage our New Release Bundle and get 10% off when you purchase all three sets together in a bundle. This discount will only be available through November 22nd, so you have to act fast!
  • See our coordinating cut files for this release HERE.
  • And, don’t forget to come back to the Flourishes Blog tomorrow, Saturday, November 16th for the Winner’s Circle where we’ll announce all of our winners of this weeks’ challenges!
Good luck!

~ Ally ~

Sponsored by Flourishes LLC

Supplies:
TOP CARD:  Postcard Christmas
stamps:  Flourishes (So Distressed, Snow Day, Christmas Candles, Vintage Postcard)
cardstock:  Flourishes  (Classic Kraft, Cool Neutrals Collection)
patterned papers: Authentique (Glistening)
die cut shapes:  Spellbinders
ink:  Memento, Ranger
pin:  Maya Road
button, string, ribbon: Flourishes.


BOTTOM CARD:  Coffee Time Clocks & Gears
stamps: Flourishes (So Distressed, Grab a Cup)
cardstock:  Flourishes (Classic Black & White, Sunflower & Tiger Lily Collections)
embossing folder:  ProvoCraft

ink:  Memento, Ranger
jute: Flourishes.

Introducing... Friendship & Flowers

Friendship&FlowersGraphic
This set, illustrated by Sam Pickard will send sunshine to any friend - near or far! With a beautiful pincushion flower at the center of this set, you'll find a beautiful butterfly and beautifully scripted sentiments add just the right touch. Set measures 4" by 6”. We think it has the perfect heartfelt friendship sentiments in it and we know you’ll love it! The Design Team did a great job celebrating friendship with this set and we know you’ll be inspired.

Welcome to the second day of our November reveals for Flourishes! Today's stamp set is just filled with gorgeous images and beautiful sentiments.  I could help but want to paper piece my flowers and butterfly from the "Friendship & Flowers" stamp set for my card today...

I stamped my flower heads using Memento "Tuxedo Black" ink onto two different kinds of patterned paper and fuzzy fussy (lol... apparently writing posts in the middle of the night doesn't bode well for me! :) ) cut them out.  I did the same with my butterfly.  I added a bit of sparkle and pearls to catch your eye...

To mat my panel of patterned papers, I used some "Red Devil" cardstock from the Poppy Color Made Easy cardstock collection.

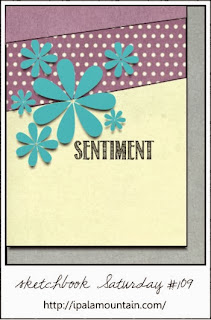
For my card base, I used my Scor-Buddy and embossed some random lines in my Classic White Cardstock. And for my card's design, I was inspired by Iwona's sketch this week from Sketchbook Saturday, sketch #109.

http://www.ipalamountain.com/2013/11/sketchbook-saturday-challenge-109/

Thanks for stopping by!  Enjoy the hop and all the fabulous pieces of inspiration this week!

While you’re hopping and looking at their creations, don’t forget to try to figure out….

Mystery-Blogger-Graphic

Hidden among the Design Team’s blogs today is our Mystery Blogger of the day. Comment on her blog and you could be chosen to win today’s set! The more you comment, the better your chances of winning.

Do you want to win Flourishes’ November Release?

  • If you would like a chance at winning all three of our soon-to-be released November sets…you can play in our Grab A Cup Challenge – we will have multiple winners there! Deadline for entries is FRIDAY November 15th at 5 PM EST. Check out the link for the official rules!
  • All three of our November sets can be pre-ordered now, even before you see them all! Take advantage our New Release Bundle and get 10% off when you purchase all three sets together in a bundle. This discount will only be available through November 22nd, so you have to act fast!
  • Keep in mind, all of these sets will be live first thing Friday morning in the Flourishes store along with the coordinating cut files for this release.
  • And, don’t forget to come back to the Flourishes Blog Saturday, November 16th for the Winner’s Circle where we’ll announce all of our winners of this weeks’ challenges!
Be sure to stop on by tomorrow when we share a set we know will become a staple element you’ll reach for time and time again. Don’t distress…it’s coming soon!

~ Ally ~

Sponsored by Flourishes LLC

Supplies:
stamps:  Flourishes (Friendship & Flowers)
cardstock:  Flouirshes (Classic White, Poppy Collection)
patterned papers: Teresa Collins Stationary Noted)
die cut shapes: Spellbinders
ink:  Memento
pearls: Recollections
tools:   Scor-Buddy
other: thread, Stickles.
 
09 10