For this week's Timeless Tuesday Challenge at Flourishes, our lovely hostess is Deborah this week! Deborah is challenging us to...
...create a project with DISTRESSING!
Let's get "In Distress"!
FTTC235
I had a lot of fun with this challenge this week! Here is what I created for Deborah's fabulous challenge this week...
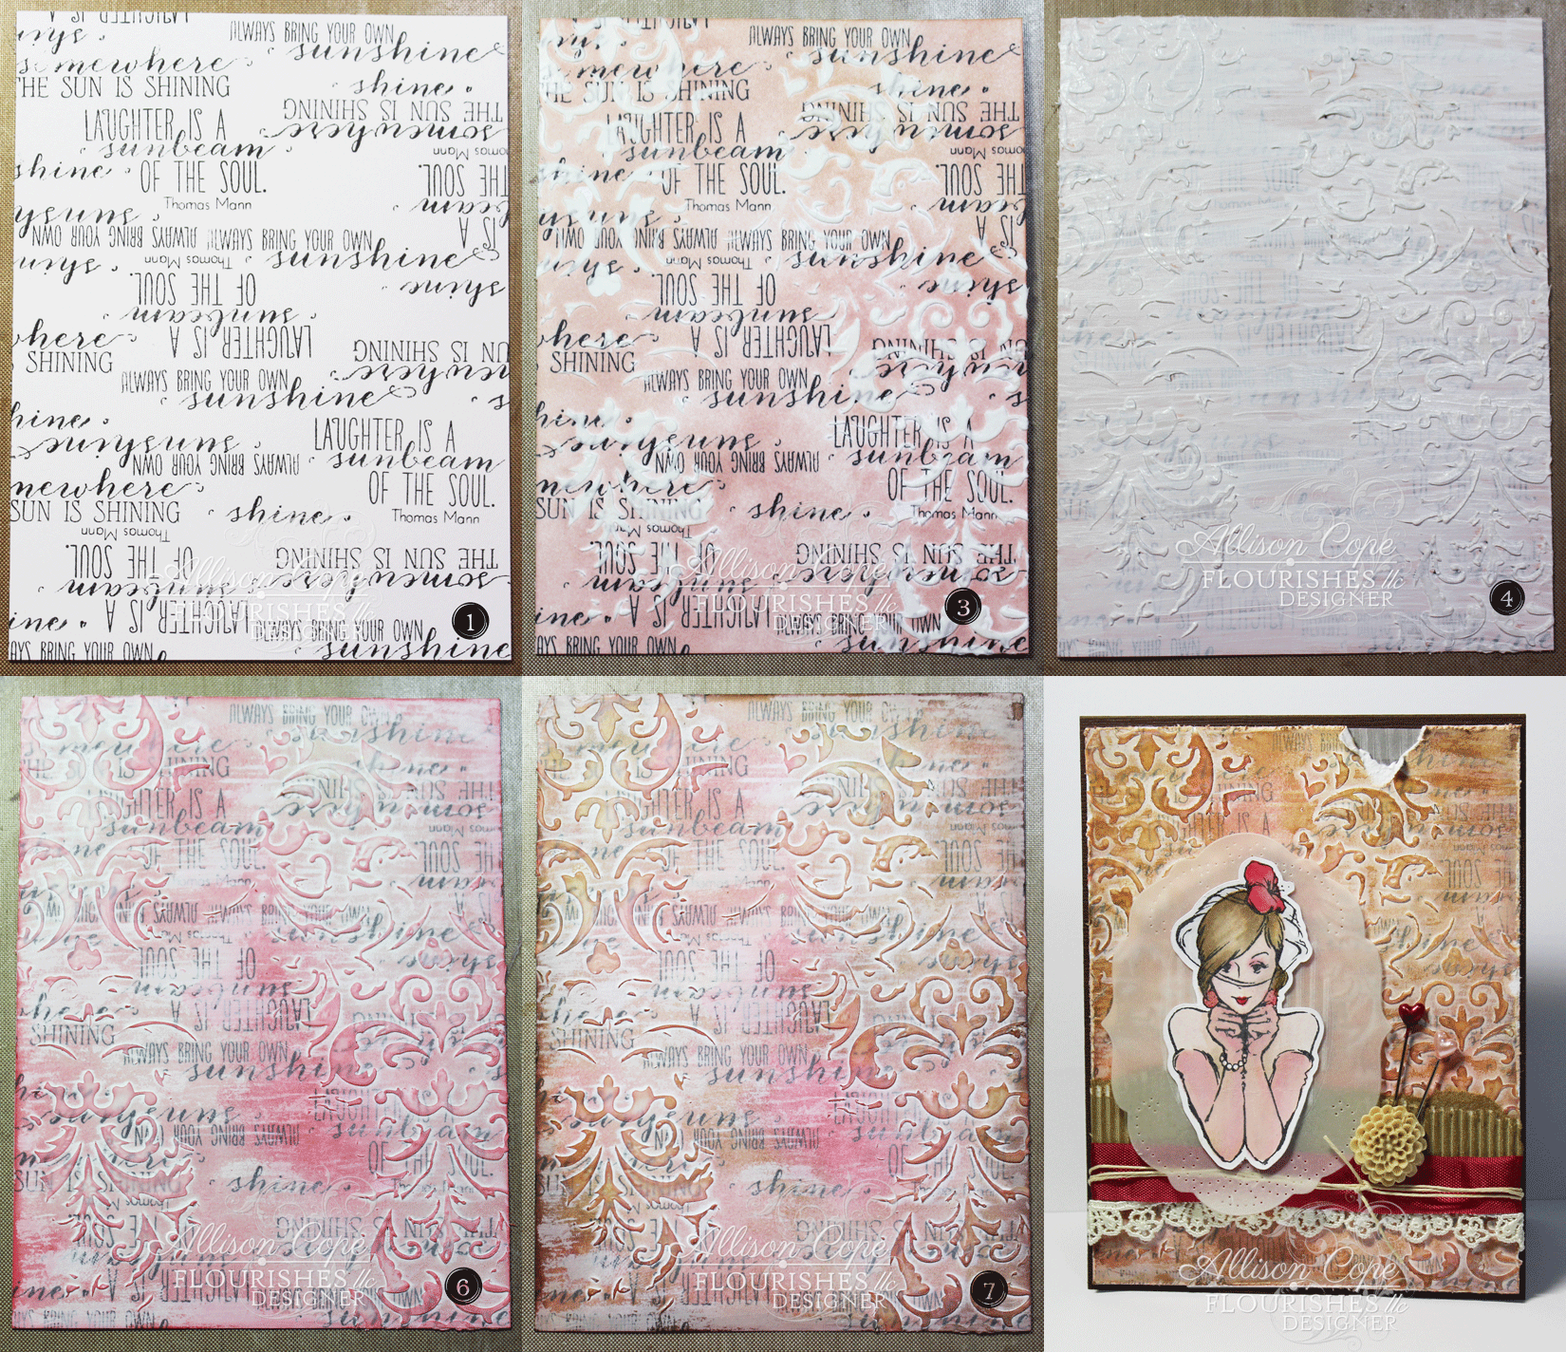
Here are the steps I used to create my distressed back ground...
Each number corresponds to the numbered image above:
- I took a piece of Flourishes Classic White Cardstock, using Memento "Black Tuxedo" ink, I stamped 4 of the different sentiments from the new "Chrysanthemum" stamp set all over it. I even stamped them upside down for interest!
- Then I used a stencil and applied some areas of 3D molding paste to give the card front texture.
- Then I rubbed on some Ranger "Tattered Rose" ink using an Ink Blending Tool.
- Then I applied a heavy layer of gesso using a brush.
- While the gesso was quite wet, I took a damp sponge and wiped off some of the gesso to reveal the colour and stamping.
- Next I took some dark pink Ranger ink; rubbing it in some spots and not others.
- Then I added some "aging" to the back ground with some darker brown ink.
- And finally, I added some fun metallic bronze paint to the raised portions and edges of the back ground for that touch of sparkle!
For my focal image I used the rather fabulous chic lady in the veil from the "Glamour Girls" stamp collection! I cut my shape from Flourishes Classic White Cardstock using the amazing Glamour Girls Silhouette Cut File, and then I stamped my image using Memento "Black Tuxedo" ink. I coloured her in using all of the fun Distress Inks I used to create my back ground!
To give her some focus, I popped my fabulous gal up onto a vellum cut of our Perfectly Pierced Victorian Ovals! I love how the vellum allows you to peek at the back ground behind!
For a touch of colour and texture I wrapped my card front with "Basque Red" Seam Binding Ribbon, a piece of White Floral Venice Lace and quite couple of loops of the Ivory Jute!
Now... take a moment and check out my fellow DT member's creations this week...
- Allison Cope ~ you are here!
- Broni Holcombe
- Cheryl Lea
- Deborah Anton
- Jenny Gropp
- Judy Rozema
- Marie Ross, our August guest designer
Sponsored by: Flourishes LLC
Supplies:
stamps: Flourishes (Chrysanthemum, Glamour Girls)
cardstock: Flourishes, Bazzill
corrugated cardboard: K & Company
die cut shapes: Flourishes/Spellbinders
ink: Memento, Ranger
paint: Ranger
ribbon/lace: Flourishes
3D molding Paste: American Traditional Designs
tools: Scor-Pal
other: vellum, pins, flower.


7 comments:
I just love how you created your background, Ally! Your card is fabulous! Beautifully stamped, coloured and created! x
Love your fabulous distressed background Ally!
Amazing - Love how you used Gesso for texture!
What a gorgeous distressed background, Allison! I love how you showed your steps to get there! Beautiful card!
Beautiful and sounds like alot of fun to make too!!!
This card is Stunning, Allison! Fab distressing on that bg, and I love all the trims and embellies! Very cool how you used a slide show for your tutorial!!!
Amazing card. Love the photos you posted to recreate the background. Thank you.
Post a Comment