Hey hey hey! It's Tuesday and time for another Timeless Tuesday Challenge from Flourishes!
This week our lovely hostess is Katie Sims! For our challenge this week, Katie wants to see...
Christmas in July!!!...
but there's a catch... your card needs to be semi flat for mailing,
so NO big bows or lumpy, bumpy envelopes here!
FTTC228
For my cards this week, I started off by making a pair of flat cards. I created some A2 card bases using some "Patch" cardstock from our Color Made Easy "Pistachio" collection. Then I die cut a single piece of 4 1/8 x 5 1/4 Classic Ivory Cardstock and stamped all along the die cut edges using Memento "Pistachio" ink and my "Poinsettia & Pine" bough stamp. I die cut a piuece of patterned paper to use on the opposite sides. I created my greeting using a simple circle of Classic Ivory Cardstock and a mini doily die cut. I stamped the greeting "JOY!" also from the "Poinsettia & Pine" stamp set.
Then I decided I would make another "matchy" set. I started this set A2 cards by creating their bases using some red cardstock. Then I die cut again another piece of 4 1/8 x 5 1/4 Classic Ivory Cardstock and stamped all along the die cut edges using Memento "Bamboo Leaves" ink and my "Naturally Merry" holly bough stamp. I again die cut a piece of patterned paper to use on the opposite sides. I stamped my greeting using the "Happy Holly-days" stamp from the "Dove and Holly" stamp set using Memento "Black Tuxedo" ink.
Then I decided that I would make a little pocket to hold my 4 card set. To create this A2 Card Fold Over Box you can download my tutorial HERE.
Here is the front of my card box. I created the front panel with a triple layer of die cut circles cut from ivory cardstock. I stamped the holly and the greeting from from the "Poinsettia & Pine" stamp set. I used some crinkled up Basque Red Seam Binding Ribbon, some gold metallic string and an ivory button to decorate below my image.
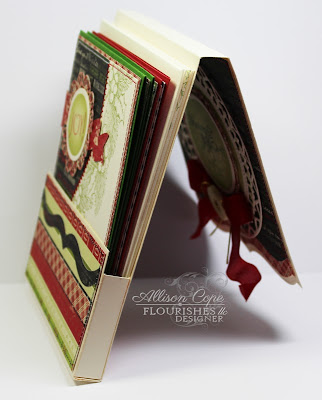
Here is a side view of my card box:
Here is my card box open and filled with my 4 card and envelope sets:
I even decorated the back of the box...
Thanks for joining me today! I hope you enjoyed my Christmas creations today and had a chance to look at my card box tutorial.
Make sure to check out my fellow Flourishes designers and their amazing Christmas projects today...
- Allison Cope -- you are here!
- Broni Holcombe
- Cheryl Lea
- Deborah Anton
- Jenny Gropp
- Judy Rozema
- Katie Sims
- Margaret Gilmer, our July guest designer
~ Ally ~
Sponsored by: Flourishes LLC
Supplies:
stamps: Flourishes (Naturally Merry, Dove & Holly, Poinsettia & Pine)
cardstock: Flourishes Classic Ivory, Bazzill
patterned papers: Authentique (Scatter Joy!)
die cut shapes: Spellbinders, Cheerylynn Designs
ink: Memento, Copic
ribbon, button, string: Flourishes
tools: Scor-Pal Tool
other: thread.


8 comments:
What a fabulous boxed set of cards. You are always coming up with such neat ideas. :)
Beautiful little gift box to hold the cards Ally. Wonderful designs and papers. Your JOY card fits this months Dirty Dozen challenge too. WHOHOOO If you are a fan club member check out the Dirty Forum! ;-) SCSCCJUL13 is the search code.
Amazing as always, Allison! All of your beautiful papers and attention to detail make this one pretty spectacular gift box of cards....you do have my addy, right? lol! This little giftie is going to make someone very happy! Awesome challenge project! :)
Love your collection and the sweet holder for them. Great work. Pat
Wow, Ally, what an awesome collection! Using both "sides" of the die cut for cards is a great way to make 2 at a time and I adore your box front! Just beautiful!
These are fantastic Ally! I love all the simple yet beautiful cards you made using all your cuts!
Oooo, Allison, this set is gorgeous! I love how you've used the border dies, and the sewing along the curved edge of the first cards is amazing! Beautiful papers and designs. Thanks for the tutorial for the box, too!
FANTASTIC cards Allison~
Post a Comment